Step 4 - Pricing & Limits
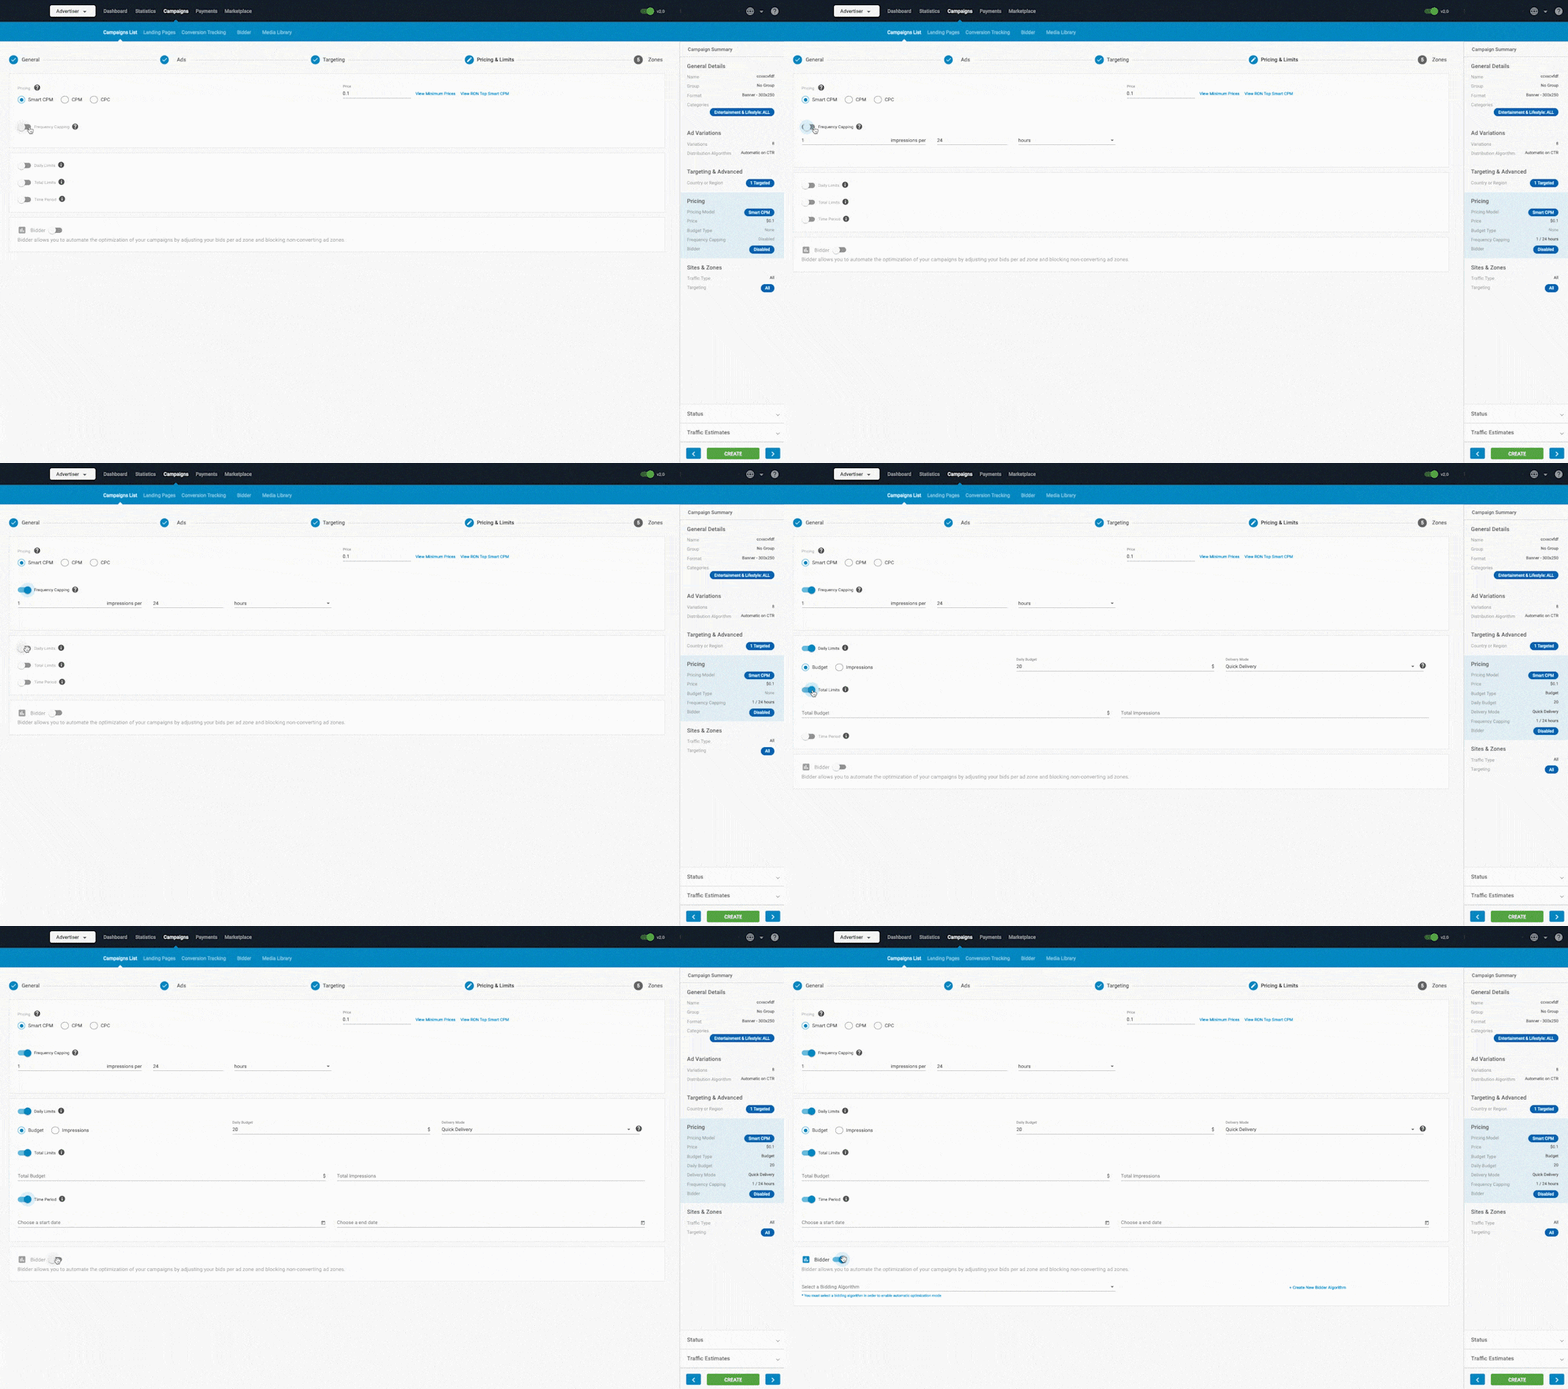
In the Pricing & Limits tab you set how the pricing will work for the campaign.
Pricing: Use the radio button to choose between the pricing models.
Frequency Capping: Use this feature to set limits on how many times a variation will be displayed to a unique user in a period of time. This feature is disabled by default. Use the switch to turn it on.
Daily limits

Turn on the Daily Limits switch to set daily limits for the Budget or Impressions for the campaign.
Budget
This is the daily budget of the campaign. We recommend that you set a budget limit from the Daily Budget drop-down menu using realistic targets. When you choose a Daily Budget, you can choose how you want that budget to be delivered: In the Delivery Mode drop-down, there are two options:
- Quick Delivery: This means that campaign will show until it has reached the Daily Budget that you set.
- Distribute throughout the day: This means that an algorithm will control how the campaign displays to ensure that the Daily Budget is reached over the course of the whole day.
Impressions
In the same way as for Daily Budget, you can set a limit for the maximum amount of impressions the campaign can receive in a single day. From the Delivery Mode drop-down, choose how you want those impressions to be delivered:
- Quick Delivery: This means that campaign will show until it has reached the Max Daily Impressions that you set.
- Distribute throughout the day: This means that an algorithm will control how the campaign displays to ensure that the Impressions limit is reached over the course of the whole day.
How budget and impressions are distributed
When the Daily Limits feature is set to Distribute throughout the day, an algorithm controls how the campaign displays to ensure the budget/impressions limit is reached over the course of the whole day.
The algorithm works like this:
When the user sets a Daily Limit for the campaign, this functions like a 'balance' of budget or impressions that the campaign has available to spend during the day, starting at 0:00 in the New York time zone. Budget and impressions are subtracted from this initial balance over the course of the day.
Our system takes snapshots of this balance every 15 minutes and uses them to calculate two things:
- Spending velocity: How fast the balance is being spent, based on the balance in each snapshot compared to the previous one.
- Acceleration: Whether spending velocity is speeding up or slowing down, based on comparing velocities between the current snapshot and the last.
We then use these spending velocity and acceleration values to tell us how much time the campaign will take to spend all of its balance if we do nothing: We use the ratio between this time and the actual time until the end of the day to calculate how much we need to slow things down, to ensure the campaign runs for the whole day.
Note: The Daily Limits and associated algorithm are set for one 24-hour period beginning at 0:00 in the New York time zone. They do not take into account Daily Limits for other days or carry over budget/impressions from previous days.
Total Limits

In this section you can set a limit on the Budget and/or Impressions the campaign can receive. The campaign will run for as much time as it takes to reach either of these limits.
Note: The Total Limits you set on budget/impressions start counting from the moment you turn them on, but do not include budget/impressions from before then. So, if you set a limit of 10,000 impressions on a campaign that already has 20,000, it will not suddenly stop. It will run until it has reached 10,000 more.
Time Period

Here you can set a time period for the campaign to run in. Click on the calendar icon to choose start and end dates for the campaign.
Pricing models
For most formats the pricing models CPC, CPM and Smart CPM will be available. For Email Clicks and Direct Links campaigns, the pricing model Smart CPC is available also.
| Ad Format | CPM | Smart CPM | CPC | Smart CPC | CPV |
|---|---|---|---|---|---|
| Banner | X | X | X | ||
| Desktop Fullpage Interstitial | X | X | X | ||
| Email Clicks | X | X | |||
| Mobile - 300x100 | X | X | X | ||
| Mobile Fullpage Interstitial | X | X | X | ||
| Native Ad - 300x300 | X | X | X | ||
| Popunders | X | X | |||
| Push Notifications (deprecated) | X | X | X | ||
| Push Notifications 720x480 | X | X | X | ||
| Tab - Direct Link | X | X | |||
| Video | X | X | X | X | |
| Web Instant Message 250x150 | X | X | X |
CPC (Cost Per Click)
You set the price you will pay for each click on the ad.
Use: This model is suitable for campaigns that have a very high View Rate but a low CTR.
CPM (Cost Per Mille)
You set the price you will pay for 1,000 impressions (views) of the ad.
Use: Suitable for campaigns focused on conversions.
Smart CPM
Smart CPM is our custom pricing model which allows you to bid for impressions at the best price possible.
When using Smart CPM, you set up the maximum you are willing to pay, and the system will determine the cost based on the minimum price for that Geo/device and the top CPM that is running in that target at the moment.
The system determines the lowest price you must pay to get the best position in the rotation of the campaigns up until your maximum bid price.
Use: Smart CPM campaigns are also suitable for campaigns that are focused on conversions, and can help you get the best price.
Example of Smart CPM in action:
If the top bid is 0.4 cents, and you set up a Smart CPM campaign of 0.7 cents, then you will become the top bidder and get more of the traffic.
You will only pay what is needed to keep you in the top position, rather than the price you have set in the campaign. You will stay in that top position until another advertiser matches or outbids 0.7 cents, then you will start getting less traffic.
Used wisely, Smart CPM can save you time and guarantee the best visibility at the most affordable price.
Note: Be realistic with your budgets as targeting too many impressions with a large bid price and a very small budget will increase the chances of an overspend!
Smart CPC
This is only available for Email Clicks and Direct Links campaigns. Smart CPC works in a similar way to Smart CPM, but you are bidding for clicks rather than impressions.
In Smart CPC, you set up the maximum you would pay per click, and the system will determine what you pay depending on the minimum price and the top CPC, just like Smart CPM does.
The system also determines the lowest price you need to pay to get top position, up until your maximum bid price.
Use: This model is suitable for campaigns that have a very high View Rate but a low CTR.
Smart Bid
Smart Bid is a pricing model that allows Advertisers to automatically determine an optimal bid for their campaigns based on the likelihood of a user to convert. It does this by using historical information about the campaign and evaluating the contextual signals that are present at the time.
This new pricing auto-optimization tool helps drive conversions based on two different Bidding Strategies:
- Target CPA (Cost per Acquisition)
- Target ROAS (Return on Ad Spend)
Pre-requisites
In order to select Smart Bid as a Pricing model for your Campaigns you will need :
- A verified and appropriately funded advertising account.
- A conversion goal to optimize for.
- For the Target ROAS Bid Strategy your conversion goals will need to be set with Fixed or Dynamic values. More information on this can be found here.
Creating a campaign
- Create a Campaign following the instructions from our documentation.
- Select Smart Bid as your Pricing model.
- Choose a Bid Strategy of either:
- Target CPA
- Target ROAS
Selecting the Target CPA Bid Strategy
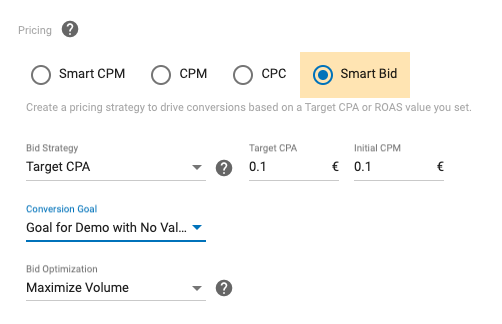
- Input the Target CPA value. E.g. $3.
- Input an Initial CPM or CPC value to start the initial bidding and to gain data significance towards determining your optimal bid value.
- Choose a Conversion Goal to optimize for. Note that if no Goal is available, you will be prompted to create one.
- Select your Bid Optimization method.
- Selecting Maximize Volume will bid more aggressively and maximize the number of conversions. We recommend selecting this for starting your Smart Bid campaign.
- Selecting Maximize Target CPA will bid more conservatively towards your desired CPA value.
- Select any other relevant campaign settings required to get your campaign running and click UPDATE.
Note: There is a minimum value validation of 0.001 on Target CPA value.
Selecting the Target ROAS Bid Strategy
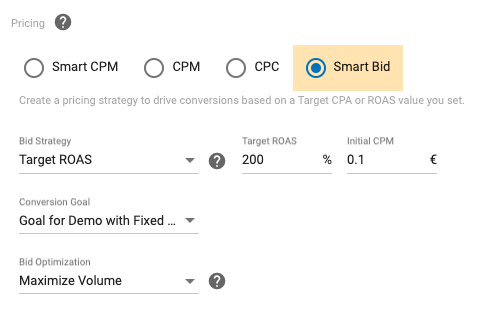
- Input the Target ROAS value. E.g. 200%
- Input an Initial CPM or CPC value to start the initial bidding and to gain data significance towards determining your optimal bid value.
- Choose a Conversion Goal to optimize for. Note that the goal must have a Fixed or Dynamic value specified.
- Select your Bid Optimization method.
- Selecting Maximize Volume will bid more aggressively and maximize the number of conversions. We recommend selecting this for starting your Smart Bid campaign.
- Selecting Maximize Target ROAS will bid more conservatively towards your desired ROAS value.
- Select any other relevant campaign settings required to get your campaign running and click UPDATE.
In-Stream pricing models
As an Advertiser, as well as CPM, Smart CPM, and CPC, you can use the Cost Per View pricing model for your In-Stream campaigns. When creating an in-stream video campaign, CPC is the price when the visitor clicks on the ad, regardless of how long they watch it for. This model is suitable for campaigns that have a very high View Rate but a low CTR.
CPV (Cost Per View)
Alternatively, instead of CPC, you can use CPV to base the cost on the visitor actually viewing the video. The cost is triggered when ten seconds of the video ad are displayed to the site visitor at normal speed.
Use: This model is suitable for campaigns that have a very high CTR but a low View Rate.
Note: There is a big difference in video ads implementation between Desktop and Mobile, which affects the View and Click Rate of the campaigns. It is strongly recommended you set up separate campaigns, one for mobile-only traffic, and one for desktop-only traffic.
How eCPM is calculated for CPC and CPM
With CPC, the eCPM will be determined by the bid price and the CTR. As a result, advertisers should have BOTH a competitive bid and generate a good CTR to receive more traffic.
With CPM/Smart CPM campaigns, the eCPM corresponds basically to the CPM bid price. With this pricing model, the more you bid, and the higher the frequency capping, the more traffic share you will receive.
Bidding and traffic estimation
Bidding
Your campaign(s) are in constant competition through our real time bidding system which is based on the calculation of the eCPM. As a result, you should have a competitive bid to receive more traffic.
To check the top CPM/eCPM bid for RON campaigns when creating a campaign, in Step 4: Pricing & Limits, click on View RON Top CPM based on your targeting selections.
To check the top CPM/eCPM bid for Premium campaigns when creating a campaign, in Step 5: Zones, select Premium from the Traffic Type drop-down and select the Premium spot you want to target. Then go to the Top CPM column and click on View. You will need to match the top bid or beat it to get a higher volume of traffic.
Traffic Estimates
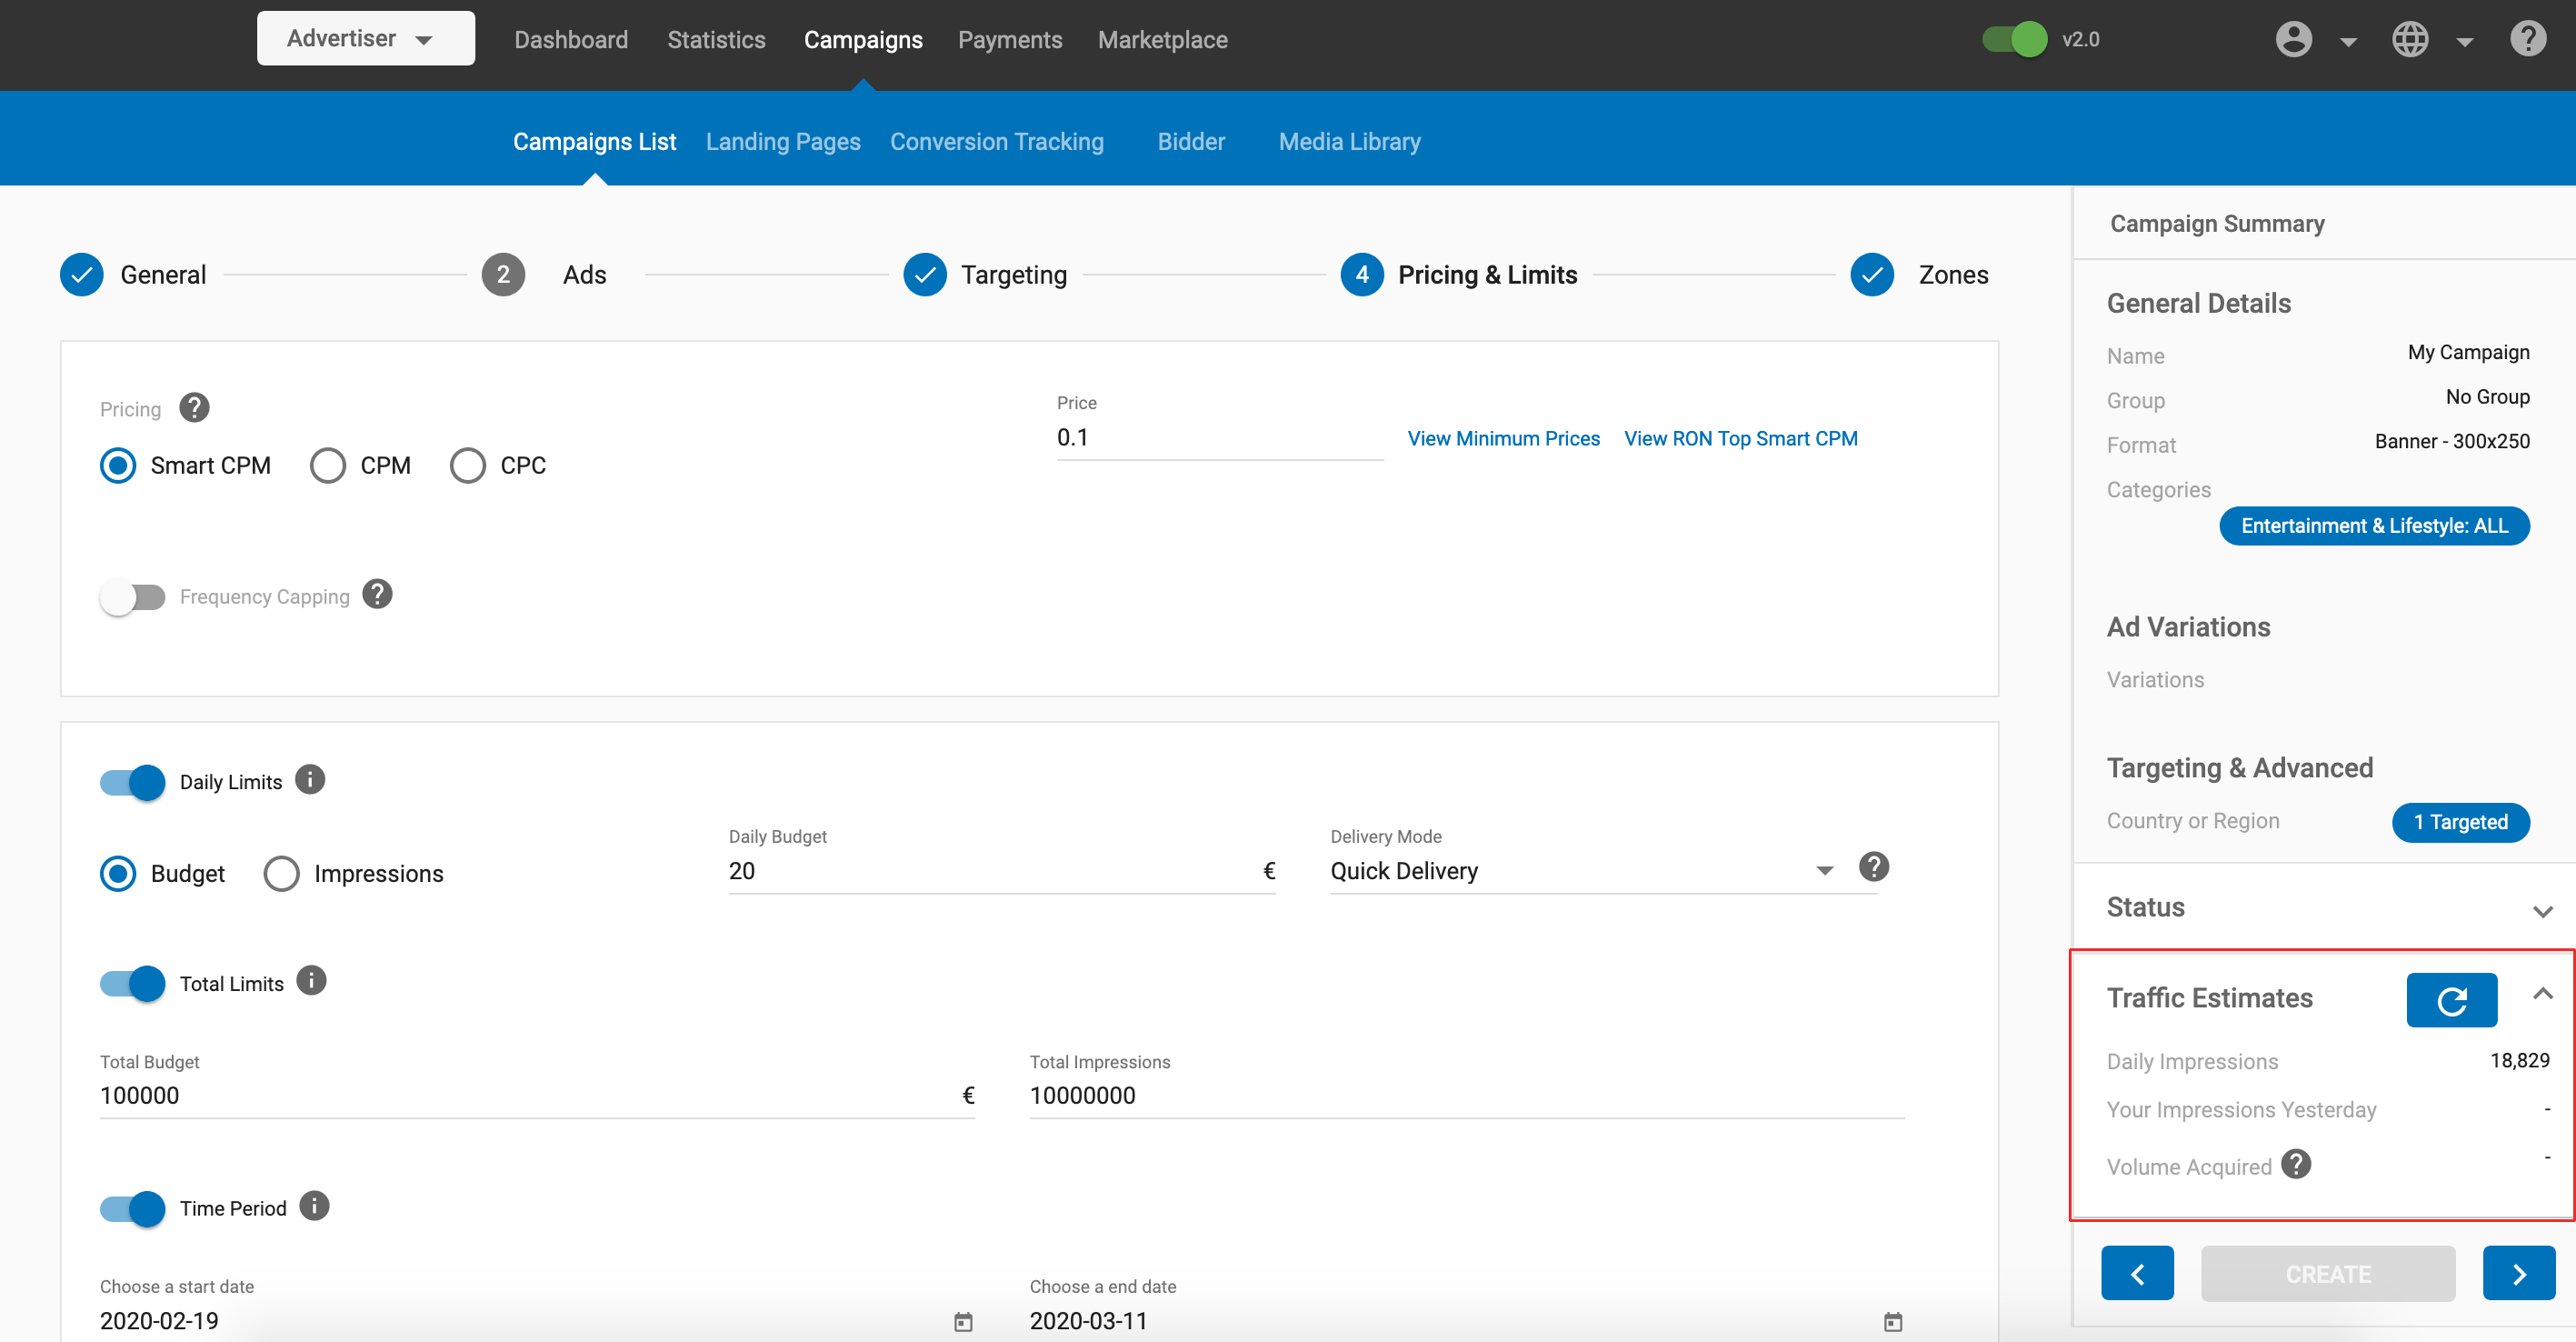
When setting up a new campaign, you will see the Traffic Estimates box on the right side of the page. Here the available daily impressions are shown based on the settings you configured in your campaign. Press the refresh button to see the estimates based on your latest changes.
Campaigns should receive traffic from the moment they run until either the daily budget has been reached or the campaign has been paused.
Note: It may take a short time for our servers to detect that the daily budget has been reached or the campaign has been paused. Campaigns will continue running until the information reaches them.
Note: High traffic volumes or selecting popular countries to target will reduce the time it takes to use your budget, so please be realistic with your settings!
Setting a budget for your campaign
The budget determines the limit of what you are willing to pay for the traffic you want to receive. It's important then, that you are realistic when setting your campaign budgets, as targeting too many impressions on a small budget may cause you to overspend. We want to ensure you avoid that!
To measure how much traffic you might receive, note the Traffic Estimates panel in the bottom right of the screen. Click on the Refresh button. Normally, the traffic that you can get is about 2-5% of the total indicated in this tab, unless you use very specific targets and you can confirm that you have the top CPM on all the sites you are targeting.
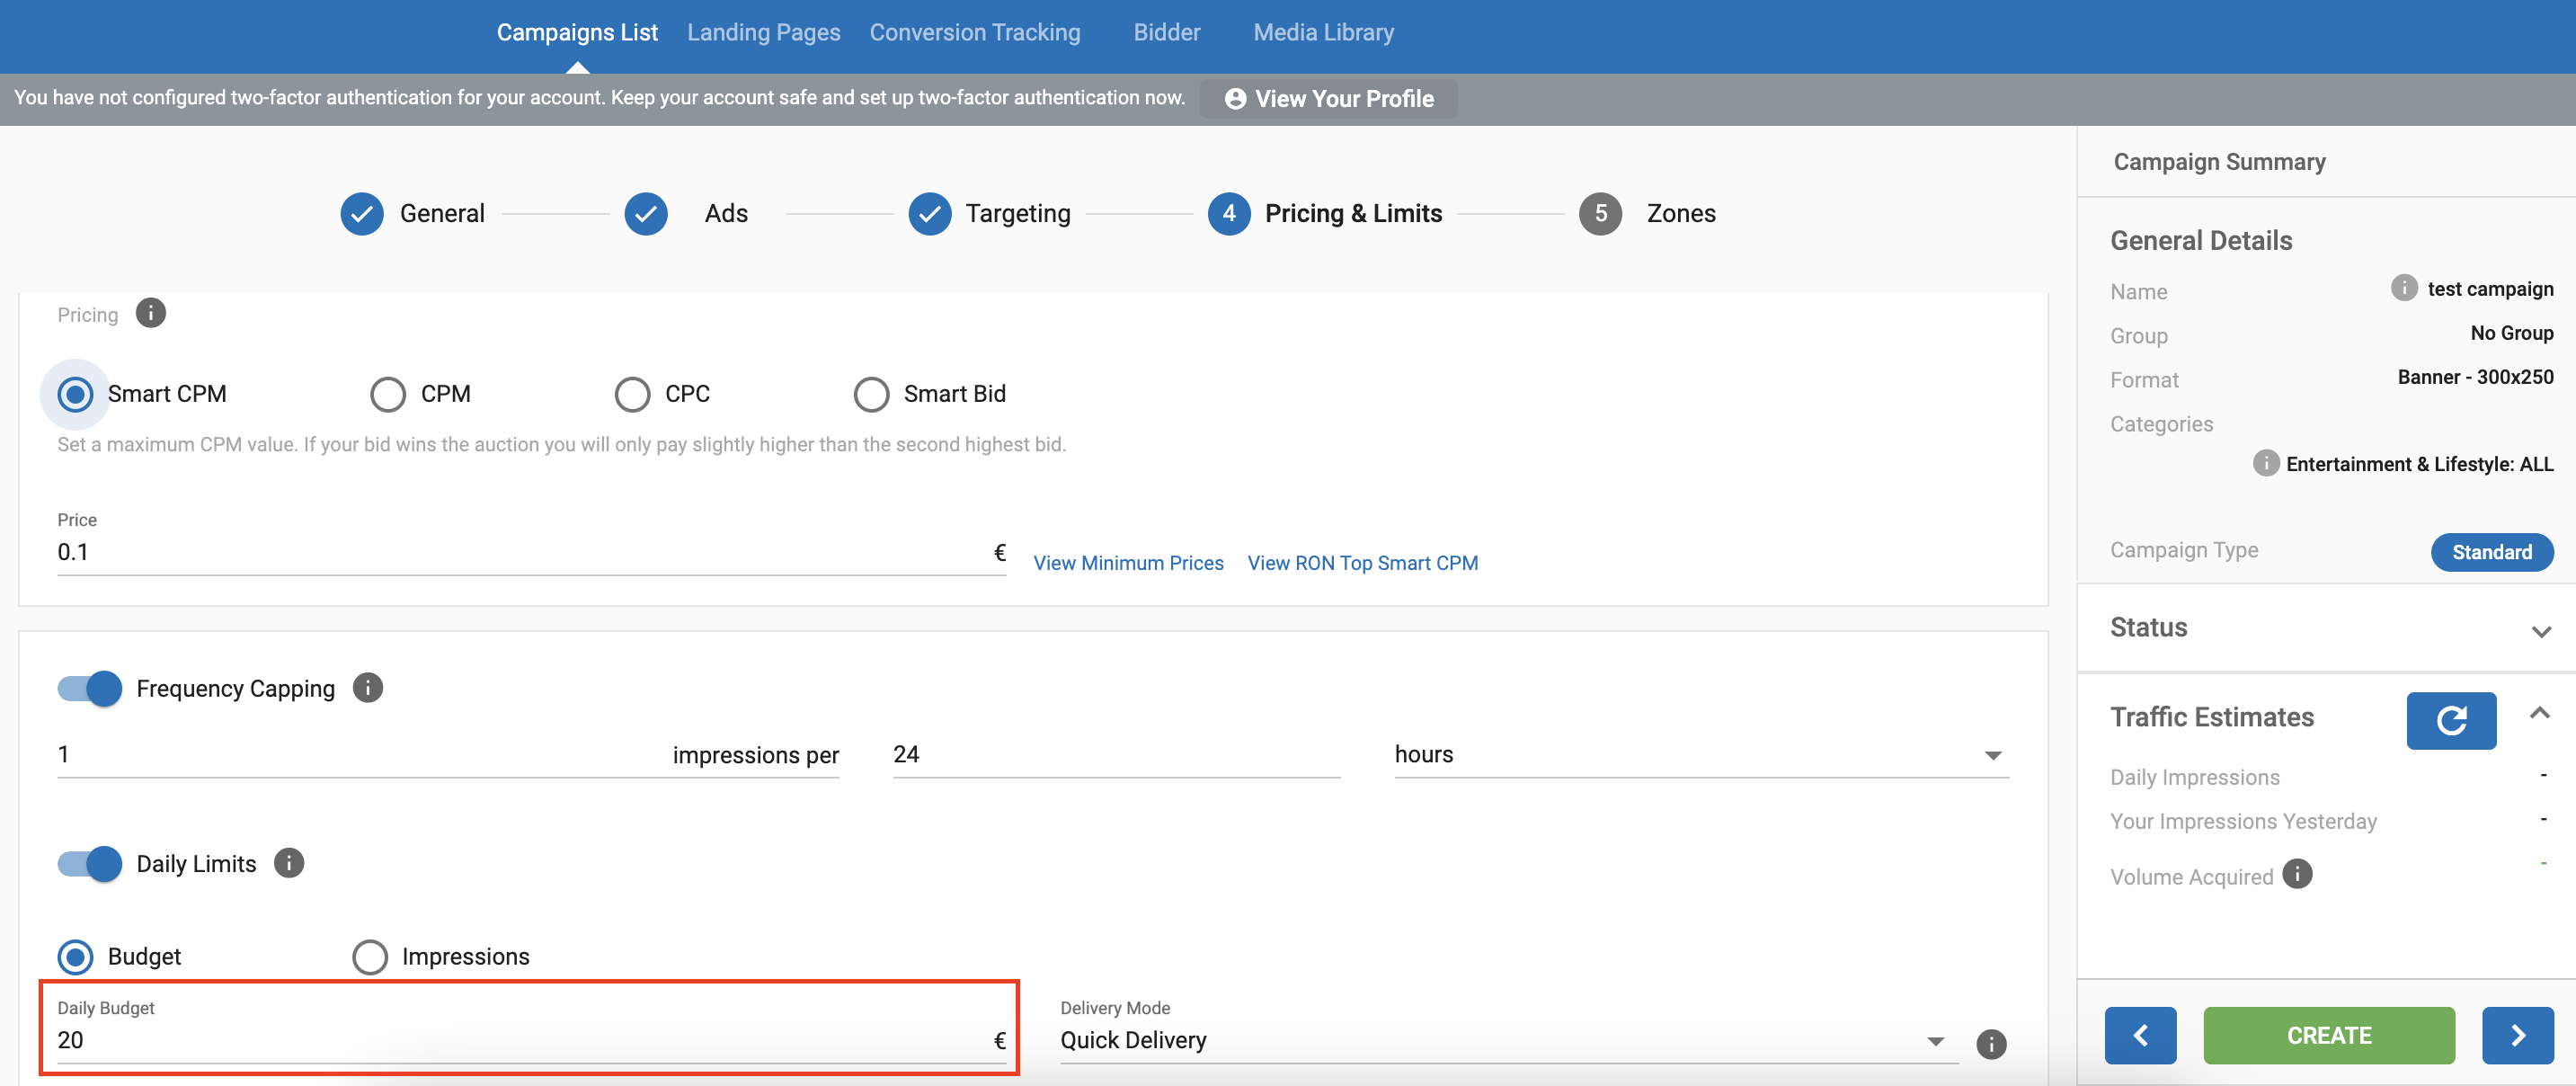
When setting up a campaign, look at the traffic estimation on the right side panel. If you are using CPM or Smart CPM pricing models, you may receive a considerable volume of impressions. Setting a low budget as in the example above will almost certainly lead to an overspend. Why?
Simply because servers will need a little time to recognize how much you have spent before stopping the campaign. In the example above, you will have spent your budget within seconds, and although our servers are quick, it will still take a minute or two before your campaign will stop.
Setting an appropriate budget
Option 1- Calculate the required budget manually
If you are the top bidder, let's say you receive between 5-10% of the daily impressions targeted. With that in mind and using the example from the screenshot above that means:
- 30,000,000 impressions/1000 (CPM) x bid price 0.10 = a budget of 3,000 per day
Option 2- Budget delivery mode
We have a feature in Step 4 of creating a campaign whereby you can choose how your campaign distributes the budget/impressions (see screenshot again). For those on small budgets you should choose the option Distribute throughout the day. If you do so, then instead of a budget of 3000 per day you should choose one for at least one hour's worth of traffic e.g. 3000/24 = Minimum budget of 125 EUR/USD.
Option 3- Reduce the number of targeted impressions
If you only want to test and do not want to spend more than 20 EUR/USD then reduce the number of impressions to fit your budget by making adjustments to your target settings in Steps 3 and Steps 5 of the campaign set up. Using the example in the screenshot above and assuming you will receive only between 5-10% of the traffic, the calculation would look like this:
- 20(budget)/ 0.10(bid price) x1000 (CPM) x 20 (assuming you are going to get 5% of the traffic = 4,000,000 impressions is the approx amount to target.
You can of course target more, using the Distribute throughout the day option or setting a lower bid price where possible and recalculating the approx impressions.
Note: We recommend monitoring your first campaigns and analyzing the statistics. Pause the campaign before making any adjustments, and remember it may take a couple of minutes for the campaign to actually stop spending.
Sample campaign bids
Unrealistic Bid
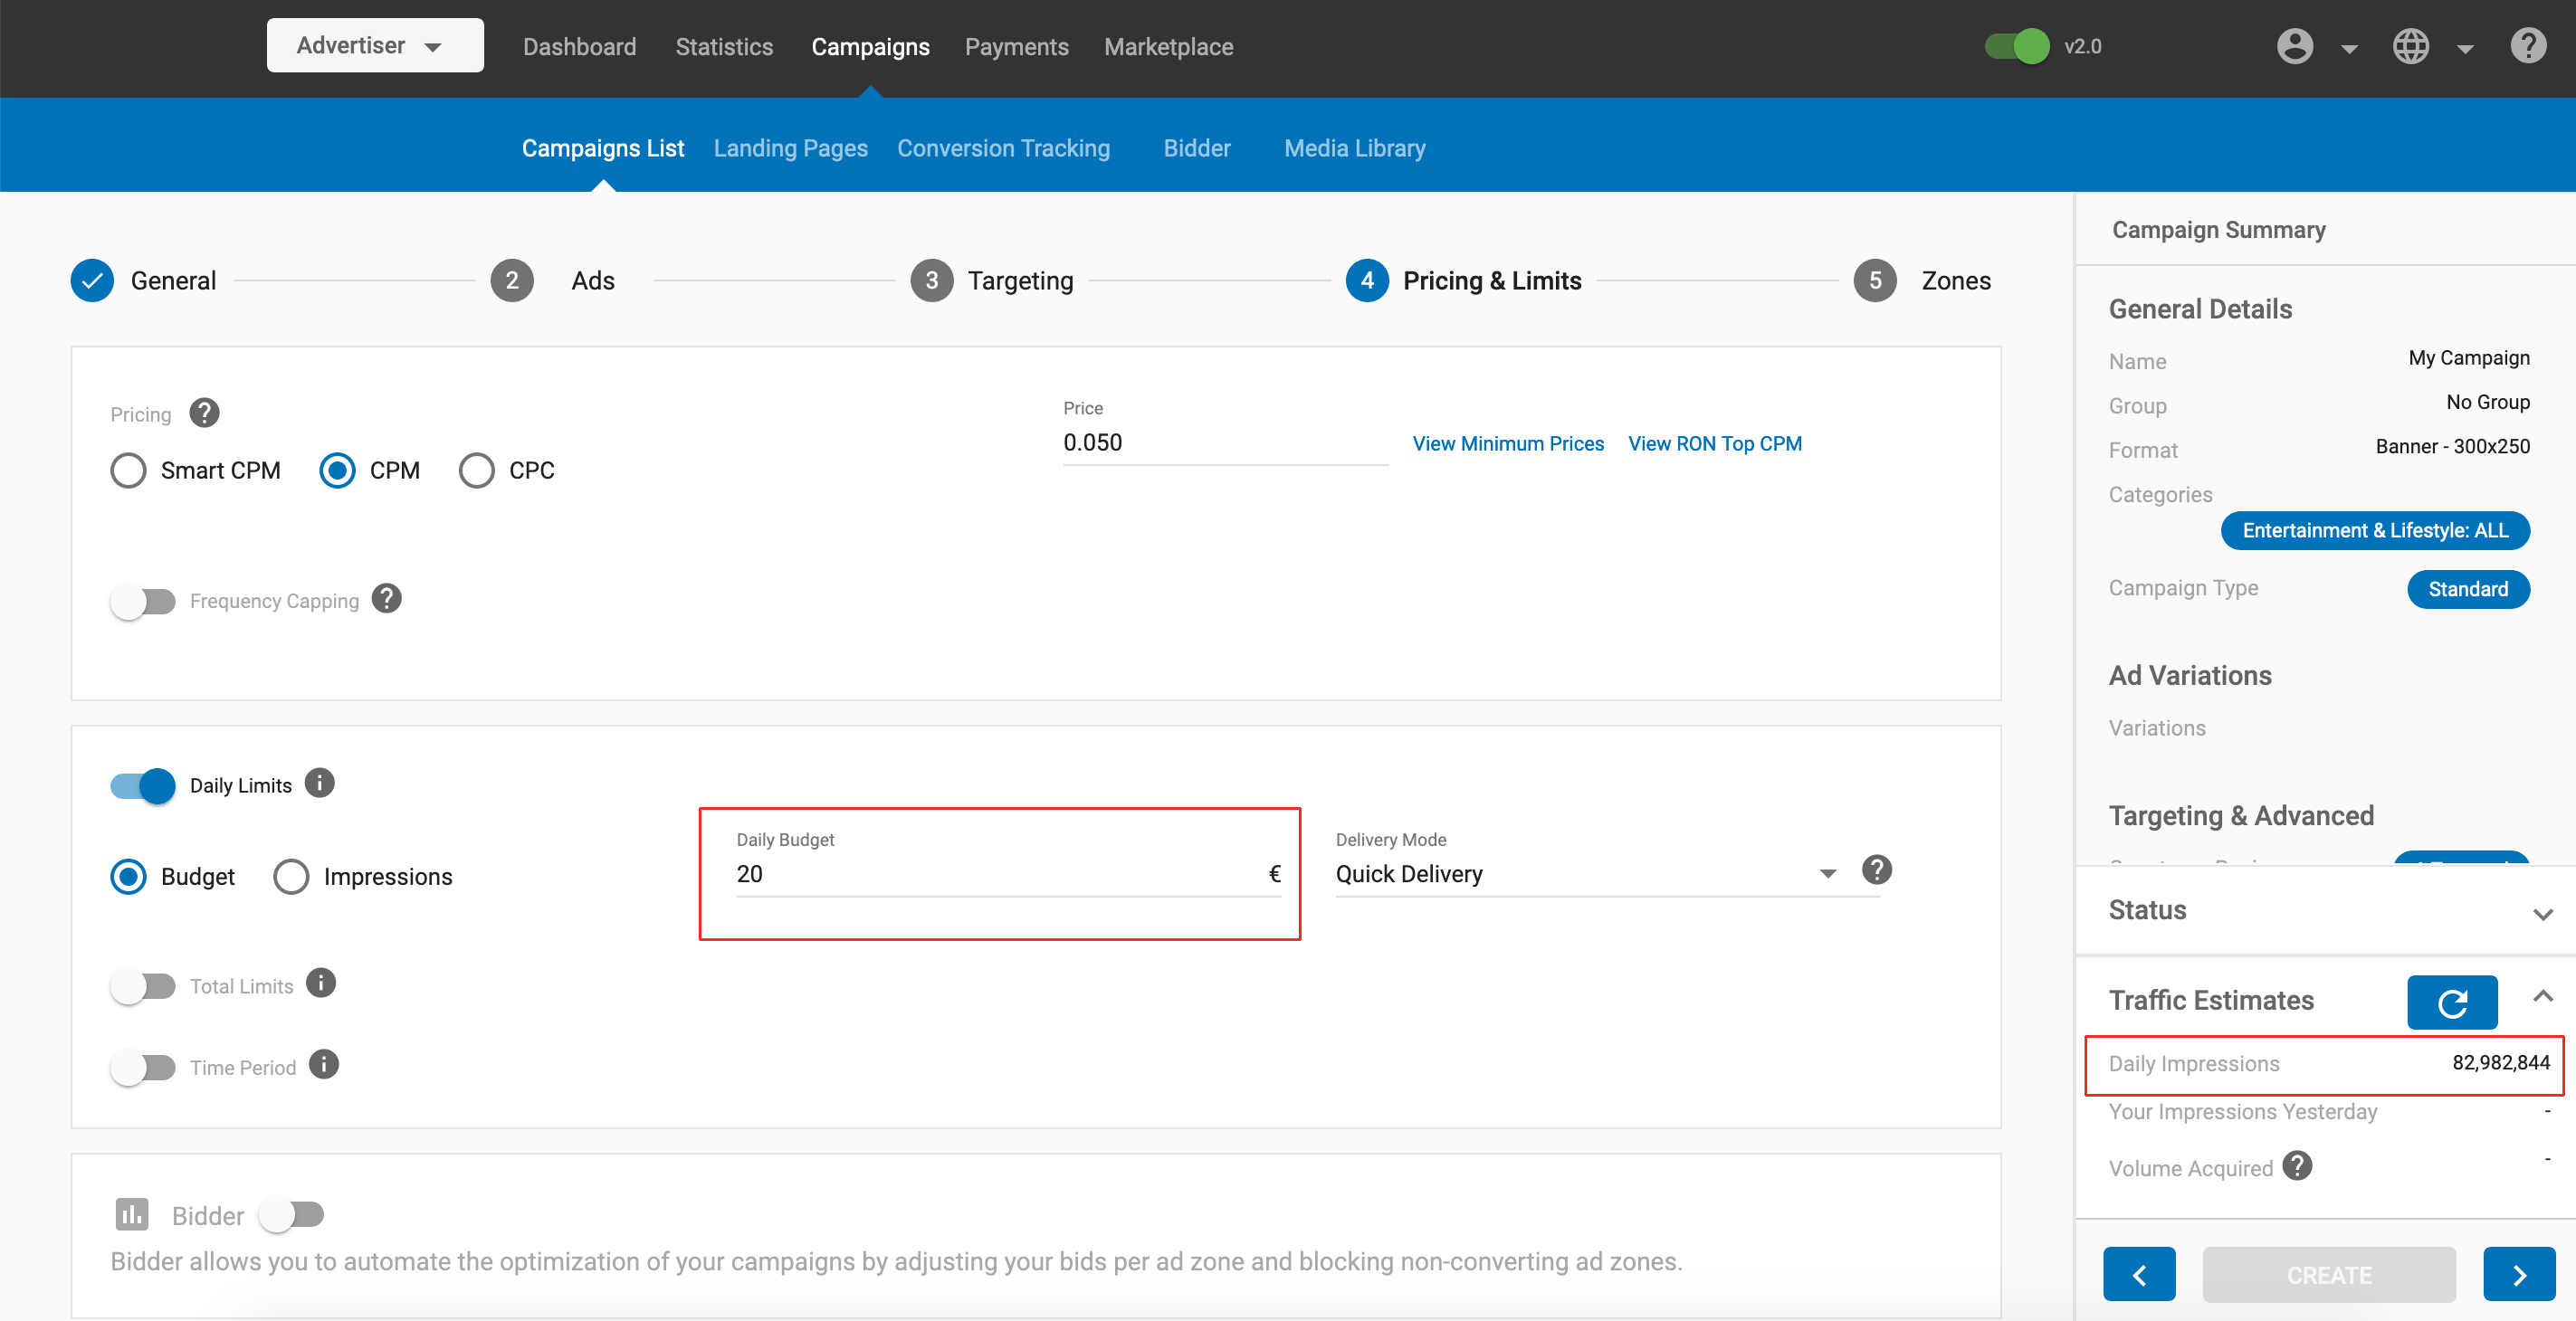
In this unrealistic bid, the user has set a Daily Limit for their Budget of $20. But because they are targeting very widely, (having selected Add All in the Targeting tab) the amount of impressions they are getting is very large. This means that they will almost certainly overspend their budget. To avoid this, the user should set a much larger budget, or focus their targeting more selectively.
Realistic Bid
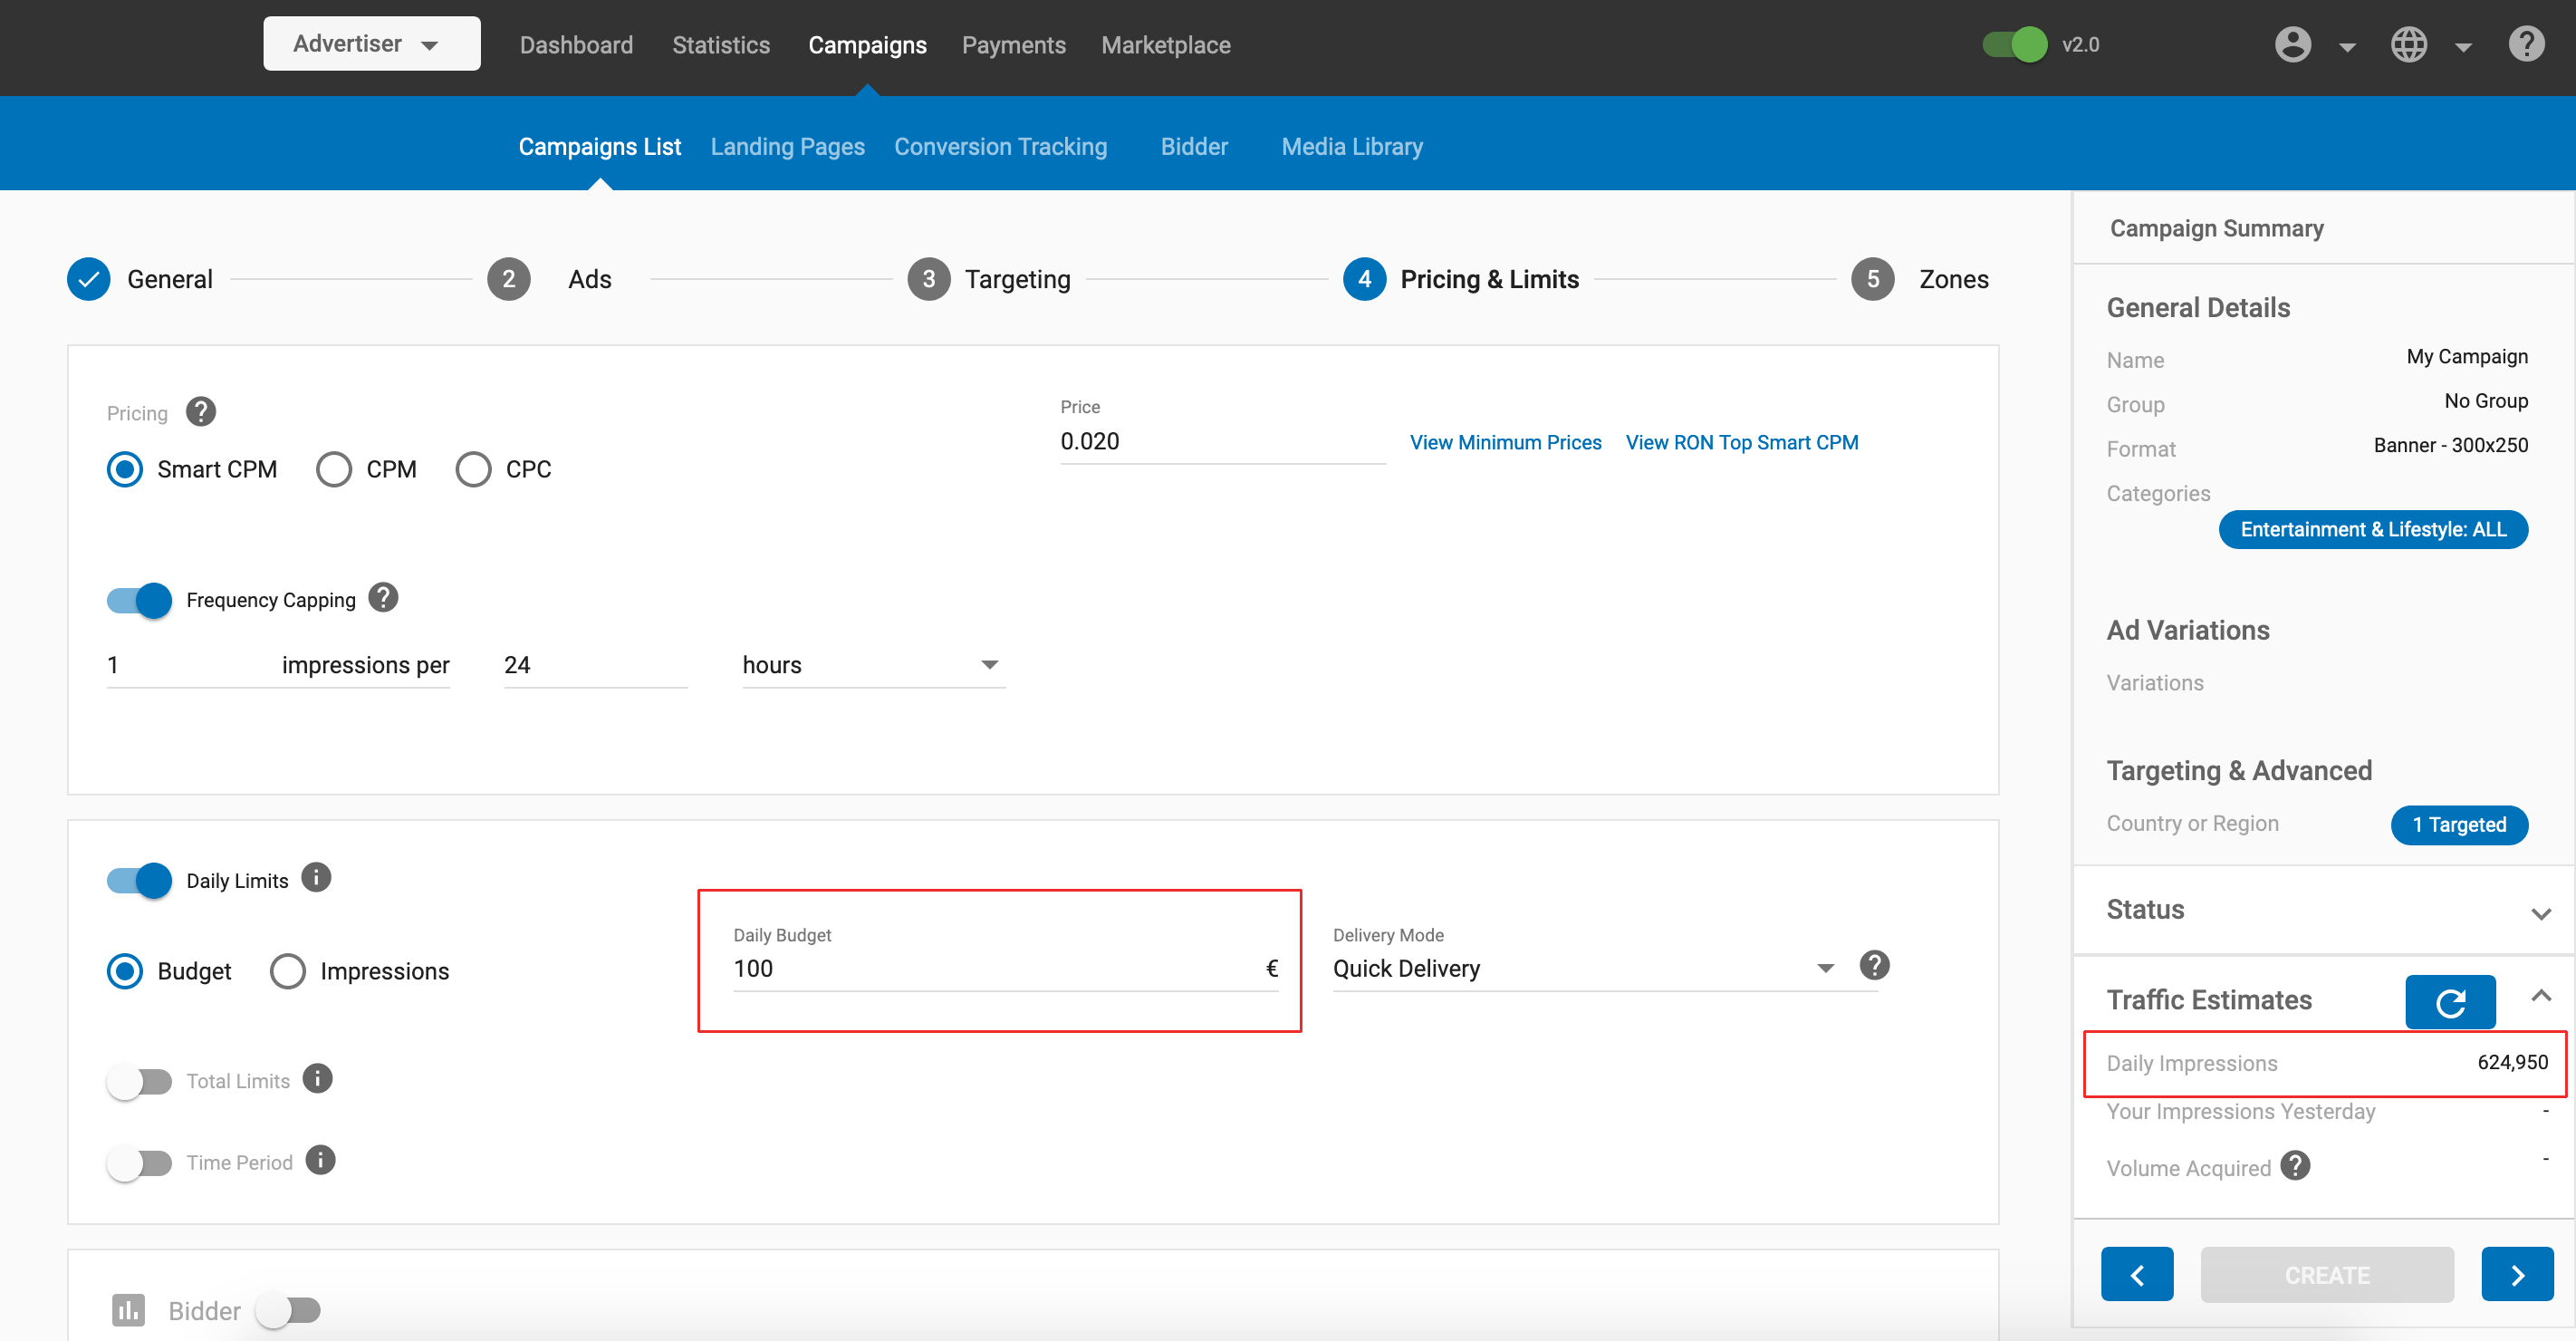
This bid is more realistic. The user has focused their targeting more selectively in the Targeting tab, resulting in a more reasonable number of impressions. In this case, the user will probably not overspend their budget of $100.
Frequency Capping
When running a CPM or CPC based campaign, Frequency Capping allows you to limit the number of times a unique visitor sees ads from it within a defined time period.

When you turn on the Frequency Capping switch, you can select whether to apply the limit at the Campaign Level or the Ad Variation Level.
You can also use the drop-downs to set the maximum number of impressions a unique visitor can see within a set number of hours or minutes, choosing from 1 to unlimited impressions.
Campaign-Level Frequency Capping: The set value determines the total number of impressions the entire campaign can receive. The sum of impressions from all ad variations will comply with and not exceed this limit.
Ad Variation-Level Frequency Capping: The set value determines the maximum number of impressions each individual ad variation in the campaign can receive.
Frequency Capping Example
Example (Campaign-Level): If you set the cap to one total impression every 24 hours in a campaign with ten variations, a unique visitor will see only one impression total from any of the ten variations within that period.
Example (Ad Variation-Level): If you set the cap to one impression per variation every 24 hours in a campaign with ten variations, a unique visitor can see up to ten total impressions (no more than one impression of each variation) within that period.
Frequency Capping Strategies
There are two major strategies for using Frequency Capping.
1. Focus on top impressions
Set a small frequency capping (one to three) and a high-CPM bid to get on top of the rotation of campaigns.
- Advantages: Traffic performances are higher and traffic is very targeted.
- Disadvantages: The lower volume and tough competition drives prices up.
2. Reach middle or remnant inventory
Set a bigger frequency capping (four to unlimited) and an average or minimum CPM bid.
- Advantages: Less competition, affordable prices. The campaign will get conversions on quantity over quality.
- Disadvantages: Traffic performance is lower. High traffic volume means you need to work more on optimization.
Note: Be careful when setting a high Frequency Capping since you can use up your daily budget very quickly and may even exceed it.
Tip: The effectiveness of an advertising message is based on repetition. By testing different types of campaigns and playing with the Frequency Cappings, you can fine-tune the campaign to get the right exposure and higher profits.
Bidder
The Bidder switch allows you to automate the optimization of your campaigns by adjusting your bids per ad zone and blocking non-converting ad zones. If you turn the bidder on, you can define a bidder algorithm by clicking +Create New Bidder Algorithm. Once you have defined a bidder algorithm, you can simply select it from the drop-down to apply it to future campaigns.
You can find additional information about minimum prices by clicking View Minimum Prices. You can also click View RON Top Smart CPM to check if your bid is competitive enough.

