Step 2 - Ads
Creating a variation
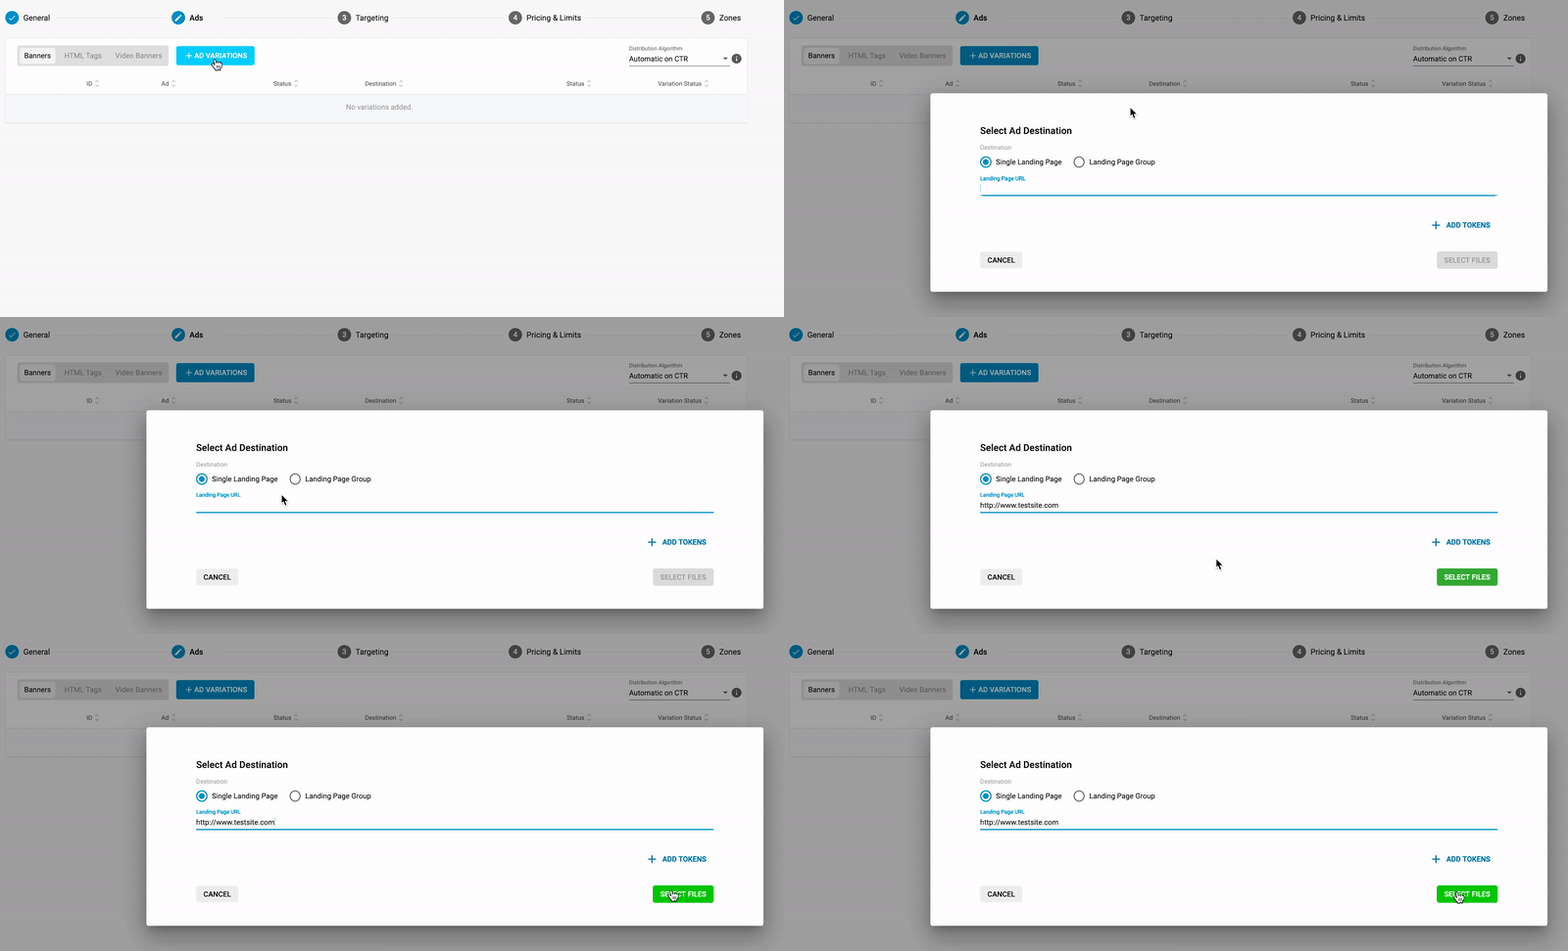
In the Ads tab, once you click on the Add Variations button the Select Ad Destination box appears. Use the radio button to choose whether this will use a Single Landing Page or a Landing Page Group.
Enter the URL for the Landing Page or Landing Page Group and click Select Files.
Using dynamic tokens in landing page URLs
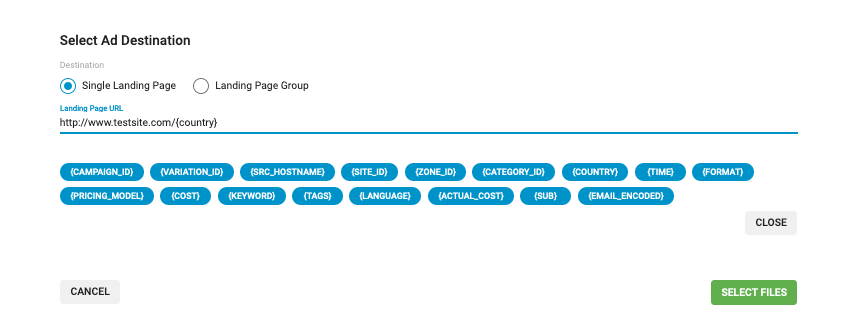
When entering URLs for landing pages or landing page groups, you can click +Add Tokens to add dynamic tokens to the URL for items such as {country}, {region}, or {day}. These tokens will then result in different URLs showing for different users. For example, the URL http://www.testsite.com/{country} could result in the landing page URLs http://www.testsite.com/france and http://www.testsite.com/germany.
Available dynamic tokens in landing page URLs
{actual_cost}: The actual CPM / CPC paid for each impression / click.
{campaign_id}: The ID of the campaign.
{conversions_tracking}: The unique ID generated when customer clicks on the ad.
{category_id}: The ID of the category detected.
{cost}: The cost of the click or impression.
{country}: The 3-character country code of the visitor.
{currency}: The currency of the advertiser's account.
{format}: The banner size. Example: 300×250.
{keyword}: The keyword that was matched in case of campaigns targeting specific keywords. This will be empty if there is no match.
{language}: The language of the visitor.
{pricing_model}: The pricing model of the campaign (1 = CPC, 2 = CPM, 3 = CPA, 4 = Smart CPM, 5=CPV, 6=Dynamic CPA, 7=Smart CPC). Some networks will not use all of these.
{referer}: Address of the web page from which the resource has been requested.
{rtb_timeout}: The RTB Timeout value in ms (applied only on RTB calls).
{site_id}: The ID number of the site where the ad is displayed.
{src_hostname}: The site name that the Publisher submitted for displaying ads, not including the HTTP protocol at the beginning (e.g. examplesite.com).
{sub}: The Publisher's Sub ID.
{tags}: The list of keywords that have been identified for that ad impression.
{time}: The timestamp, which is used as a cache buster.
{url}: The full URL of the site that the Publisher submitted to the Admin Panel for displaying ads, including the HTTP protocol (e.g. https://examplesite.com). Note: This token will not display the URL where the ad was displayed to the user; only the URL that is registered in our platform.
{user_agent}: The User Agent string of the visitor.
{variation_id}: The ID of the variation (Banner or landing page).
{zone_id}: The ID of the ad zone where the ad is displayed.
{gdpr}: This will be 0 if the user is not under GDPR, and 1 if the user is under GDPR (only available on RTB).
{gdpr_consent}: This is the GDPR consent string required by the IAB standards (only available on RTB).
{ex_[key]}: If Custom Targeting is available, all Custom Targeting tokens will be displayed using this syntax.
Note: This feature is only available on request. Contact your account manager and they can enable it for you.
- {email_encoded}: This token can be used to insert the emails of logged-in users into landing page URLs for all formats.
Additional fields when creating a native ads, push notifications or video campaign
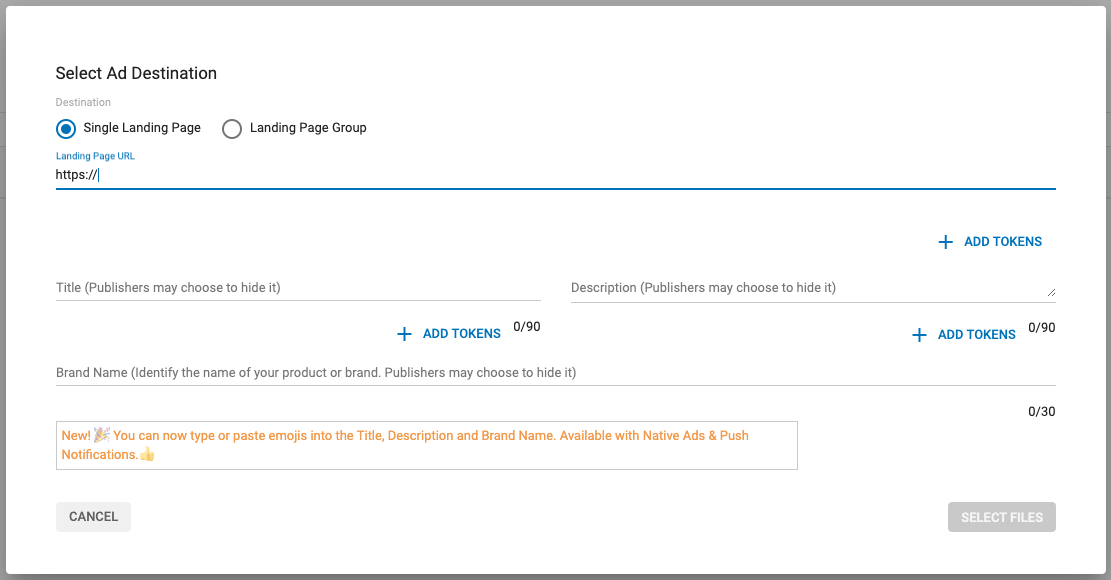
If you are creating a native ads, push notifications, or video campaign, you will be presented with additional fields that can be displayed on Advertiser's ad in case the Publisher chooses to display in their websites:
- For native ads, or push notifications campaigns there are 3 fields to add content to your ad variations:
- Title - Adds title content to your Native Ad or Push Notifications. Maximum of 90 characters.
- Description - Adds description content to your Native Ad or Push Notification. Maximum of 90 characters.
- Brand Name - Adds brand name content to your Native Ad or Push Notification. Maximum of 30 characters.
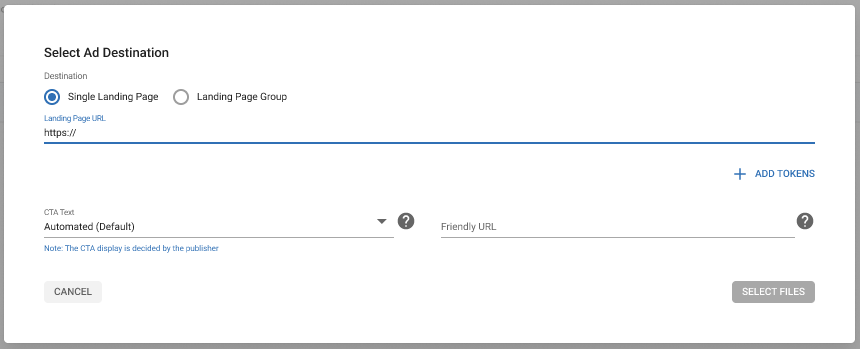
- For video campaigns there is a predefined list of Call-to-Action (CTA) text that you place on your ads:
- Automated (Default)
- Click for More
- Click Here
- Play Game
- Play Game Now
- Play Now
- See More
- See Now
- Try for Free
- View Here
- View More
- Watch Free
In addition, you will have to add a friendly URL as content in your video ad, as this is mandatory. Maximum of 25 characters.
Custom fields for banners
If you are creating a banner ad, as an Administrator, you have the flexibility to add custom fields to further enhance the capabilities of advertisers. This feature aims to provide advertisers with the ability to tailor the displayed text in banner ads.
It's possible to create up to 4 custom fields. These fields are optional and will be enabled on your Ad Server upon request.
You can render ads on the publishing side through the utilization of the Ad Placement API. After enabling the fields, they will be displayed in step 2 as shown in the example below:
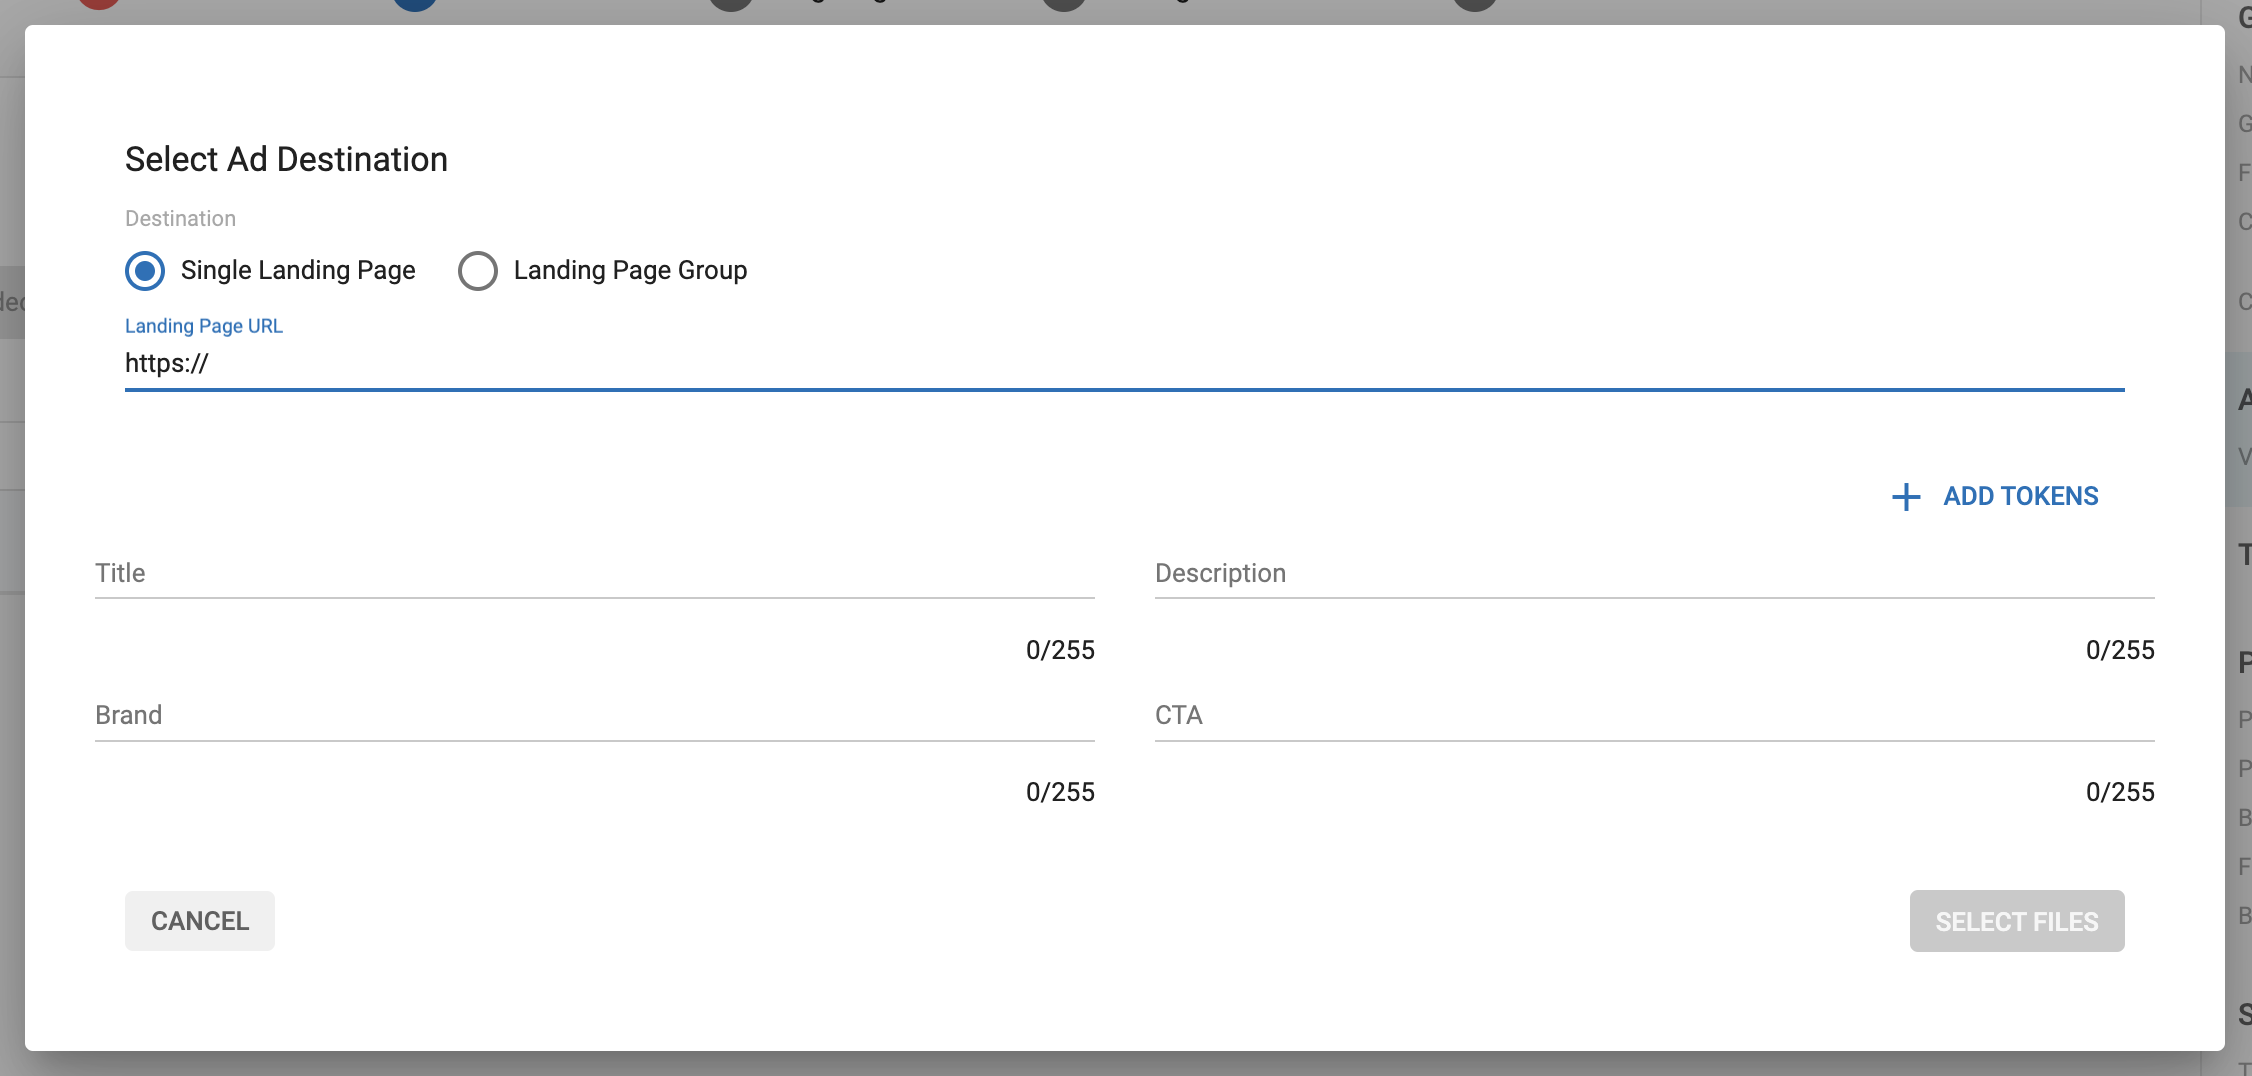
Note: The fields only accept string values - A sequence of characters. Limited to 255 characters in this context.
Using dynamic tokens in native ads and push notifications
If you are creating a campaign using native ads or push notifications in Step 2, you can add dynamic tokens for items such as {country}, {region} or {day} in the titles and descriptions . These tokens will then display localized text to the visitor based on their information, allowing you to target your ads more effectively.
For example, if you create a native ad with the title "Meet girls in {region} tonight!", a visitor from Barcelona would see: "Meet girls in Cataluña tonight!".
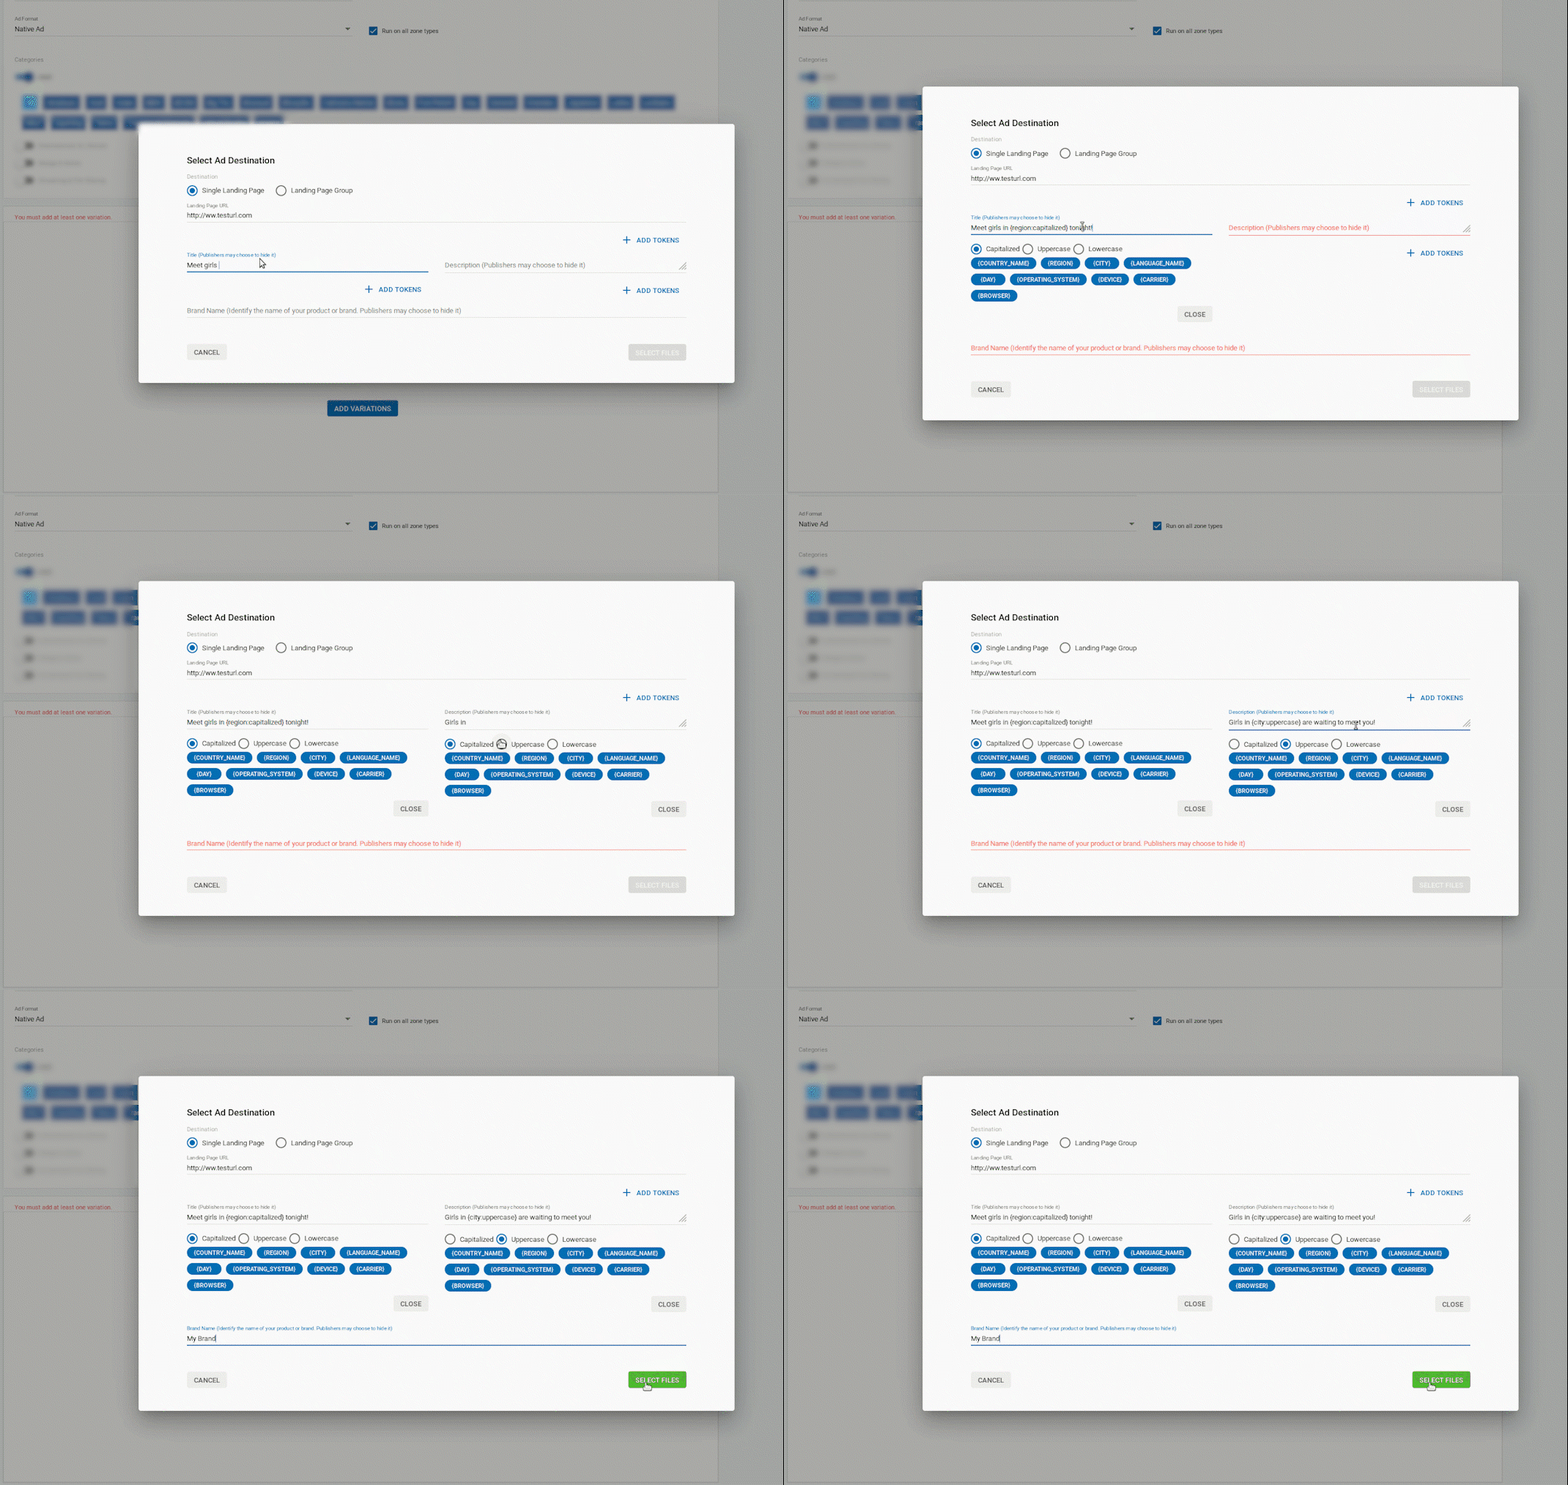
To use dynamic tokens:
First create or edit a native ad or push notification by going to the Campaigns List and clicking New Campaign, or clicking edit on an existing campaign.
If you are creating a new ad, in Step 1: General Details, select Native Ad or Push Notification - 720 x 480 from the Ad Format drop-down.
In Step 2: Ads click + Ad Variations.
In the Select Ad Destination dialog, you can use dynamic tokens in the Title and Description fields by clicking the +ADD TOKEN button beneath them. The list of available tokens will appear below the Title and Description fields.
Use the radio button to select how the token will be capitalised, and then choose the token which you wish to use.
Capitalized (default): The token will display with an initial capital: e.g. Cataluña.
Uppercase: The token will display in all uppercase letters: e.g. CATALUÑA.
Lowercase: The token will display in all lowercase letters: e.g. cataluña.
Available dynamic tokens for native ads and push notifications
{country_name}: The localized country name of the visitor. e.g. España.
{region}: The localized region name of the visitor: e.g. Cataluña.
{city}: The localized city name of the visitor: e.g. Barcelona.
{language_name}: The localised language of the visitor. e.g. Español
{day}: The localised day that the visitor is visiting the site on: e.g. Lunes, Martes, Miércoles.
{operating_system}: The operating system of the visitor: e.g. Windows 10.
{device}: The device that the visitor is using: e.g. iPhone.
{carrier}: The carrier that the visitor is using to access the site: e.g. Vodafone.
{browser}: The browser that the visitor is using.
Setting the language for the tokens
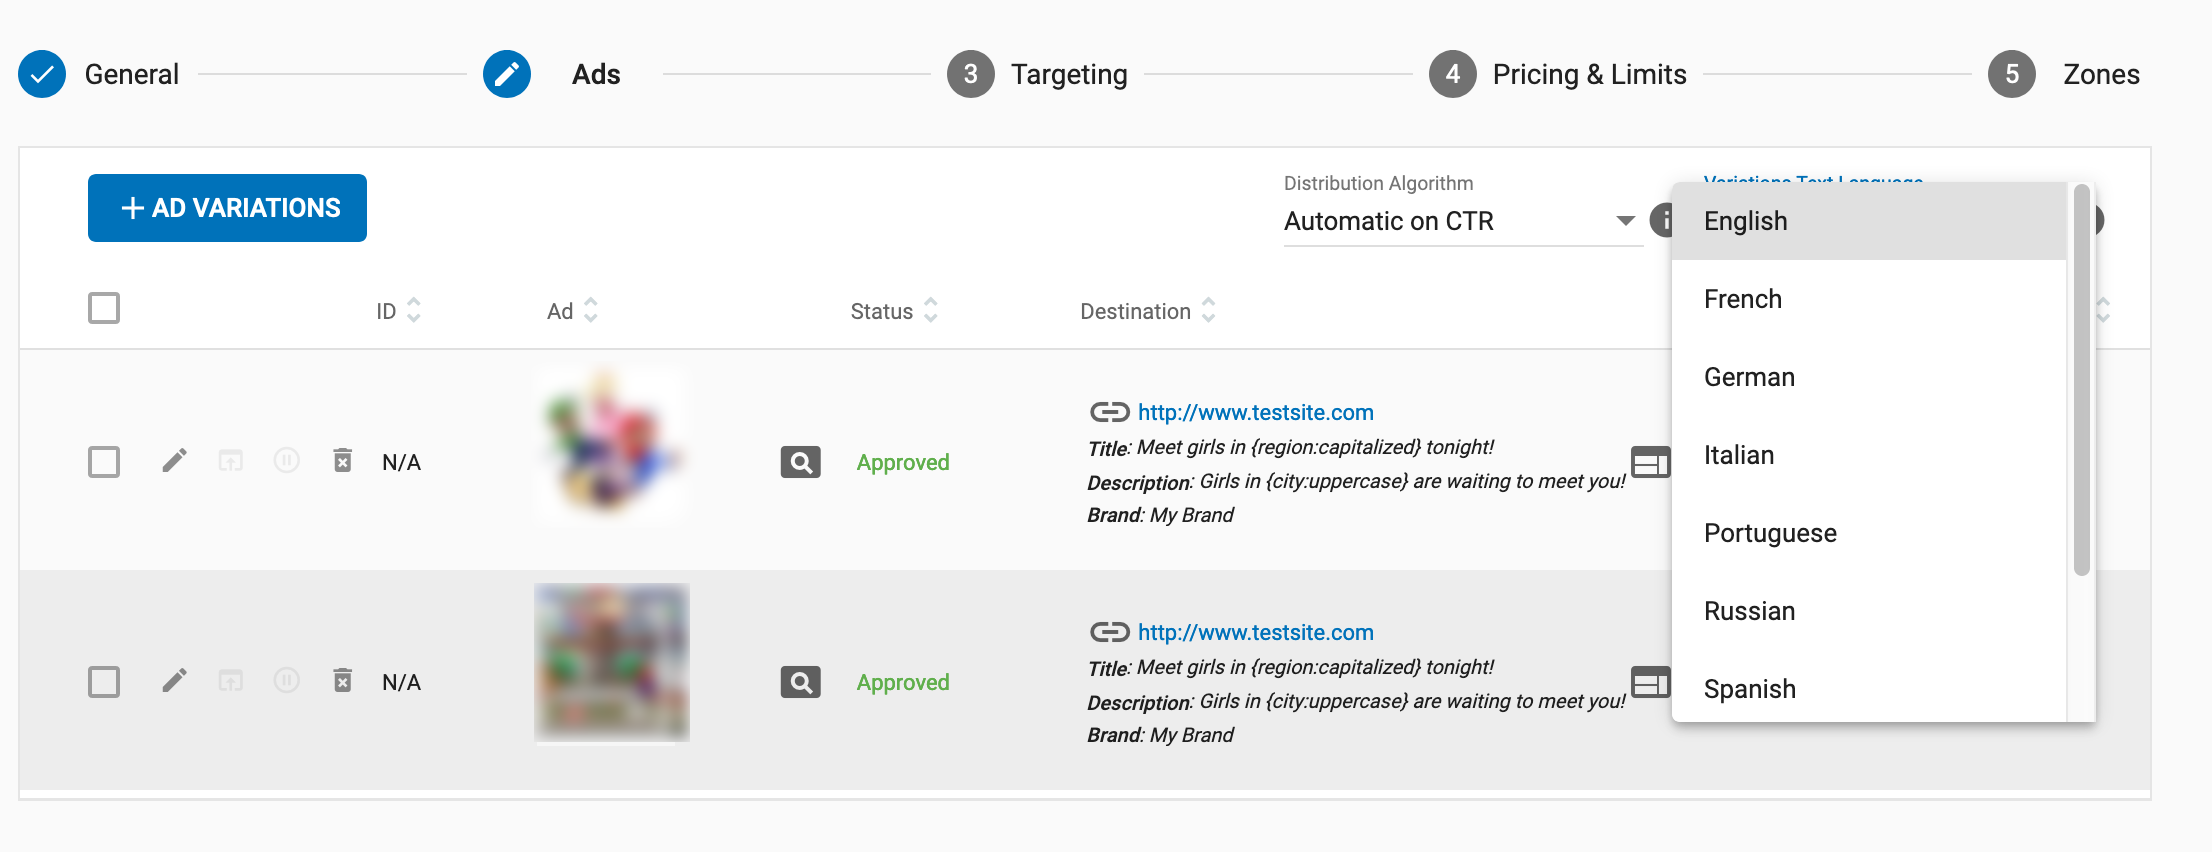
The dynamic tokens will display in the language that you set for the campaign. The language is set in the top right of the Variations list in Step 1: General Details of creating/editing a campaign. Choose the language for the tokens from the Ad Text Language drop-down. The default language is English.
Note: You can only select one language for all the variations in a campaign. For ads in different languages, you should create separate campaigns for each language.
Example:
To create a native ad like this:
Ad Title: Meet girls in CATALUÑA tonight!
Ad Description: Barcelona girls want to meet you!
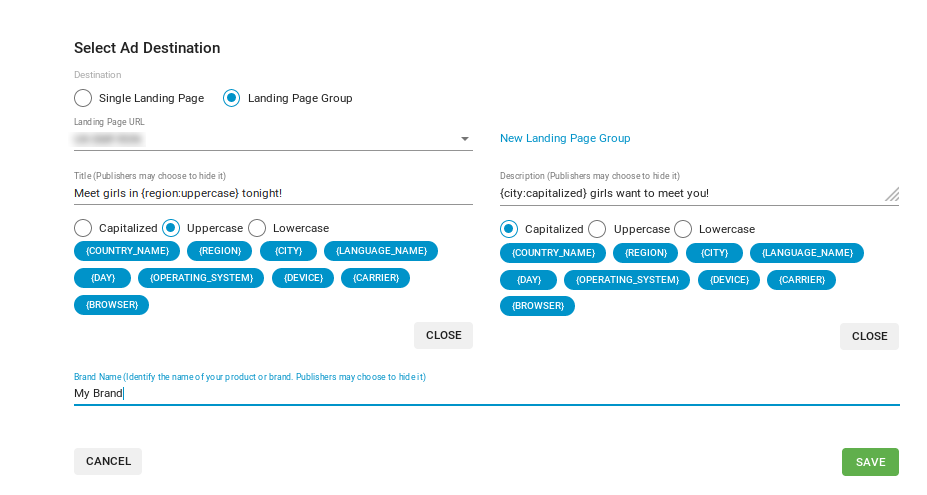
In the Title field, select the Uppercase radio button, and choose {region}.
In the Description field, leave the Capitalized radio button selected and choose {city}.
To ensure that the tokens display in the correct language, select Spanish from the drop-down at the top of the Variations list.

Adding assets to the variation
Once you have clicked Select Files, you should select the assets for the campaign in the Select Ad Assets dialog.
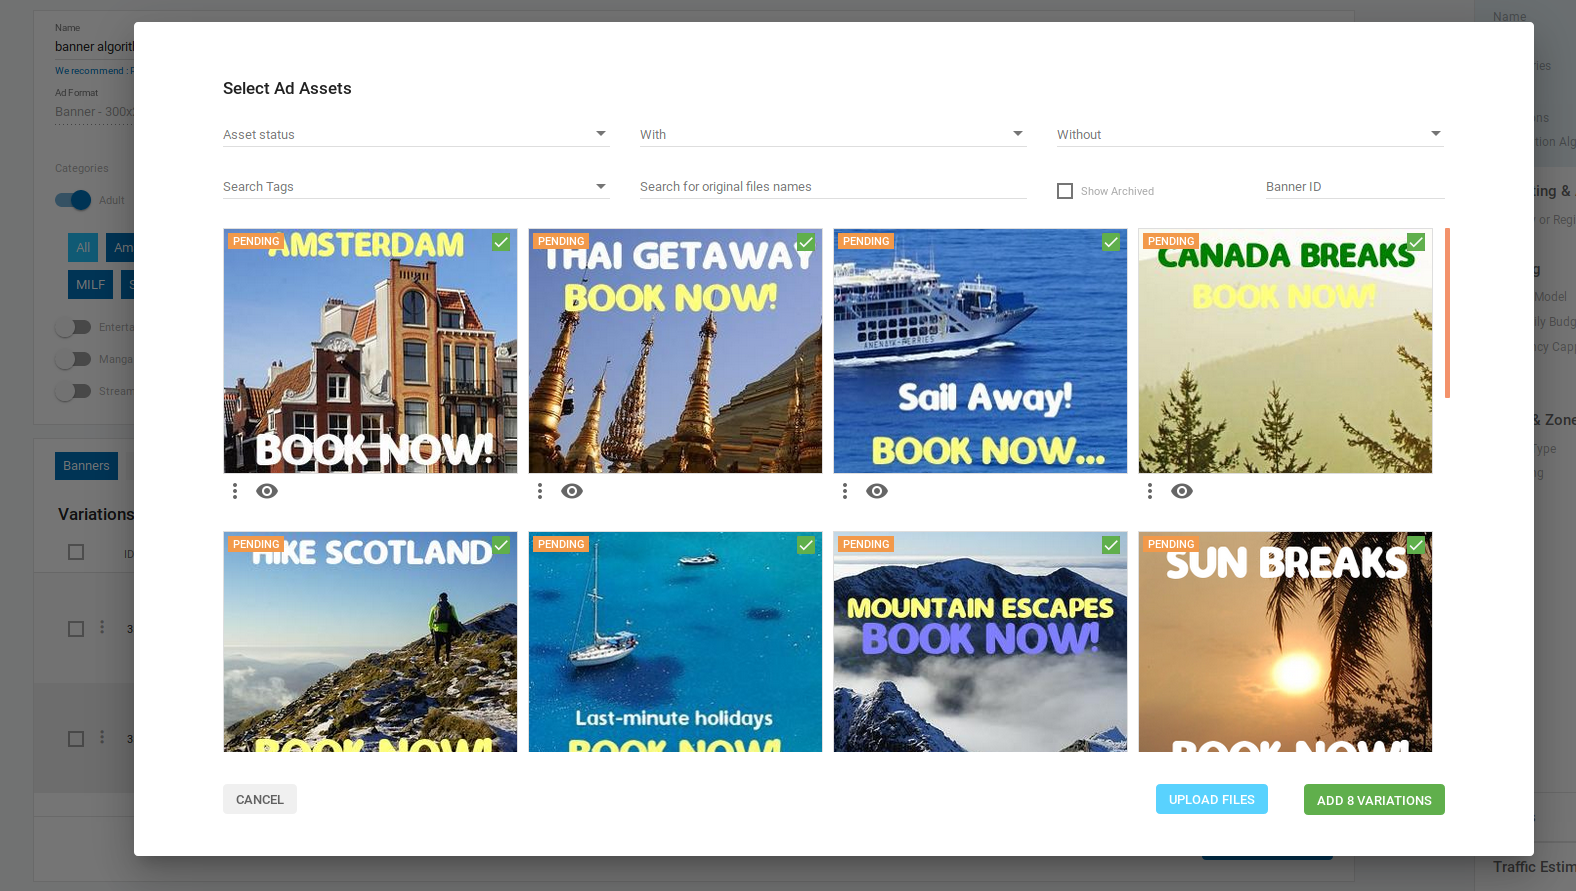
Tick the checkbox beside the image(s) or video(s) that you wish to use. Selecting multiple images or videos will create multiple variations.
- In the Select Ad Assets screen you will only see images with the correct dimensions for the ad format you have chosen.
- The same applies to videos, though videos can be +/- pixel different from the standard dimension.
- If you have chosen to create a video campaign, videos with non-standard dimensions will show also.
- If you choose to create a Native Ad, you will also have the option to add next to the image a video thumb (a video preview of the ad available when hovering over the ad).
Once you click on Ad X Variation(s) the variation(s) you have created will now be visible in the Ad tab.
Actions in the variations list

Using the icon to the left of each variation, you can perform various actions:
Edit: Edit the variation.
Test Variation: This tests the variation by simulating what happens when an ad is clicked on.
- For standard campaigns, this will redirect you to your landing page.
- For RTB campaigns, his simulates what happens when our systems request an ad, including the bid request and return.
Pause Variation: Pause the variation.
Archive Variation: This will archive the variation. To see archived variations, click the Show Archived checkbox at the top of the tab.
Custom Tracking URLs for Video Campaigns
- The Custom Tracking URLs are available only for Video Campaigns.
- The Wrapper Ad may include any number of Custom Tracking Events
- You can add dynamic tokens to custom tracking URLs.
Managing custom tracking events
Custom tracking events can be added, edited and deleted in the Variations or VAST tag popup.
Adding custom tracking events to video variation
![]()
![]()
Adding custom tracking events to VAST wrapper
VAST Campaign Settings should be enabled for your account.
![]()
Selecting a distribution algorithm
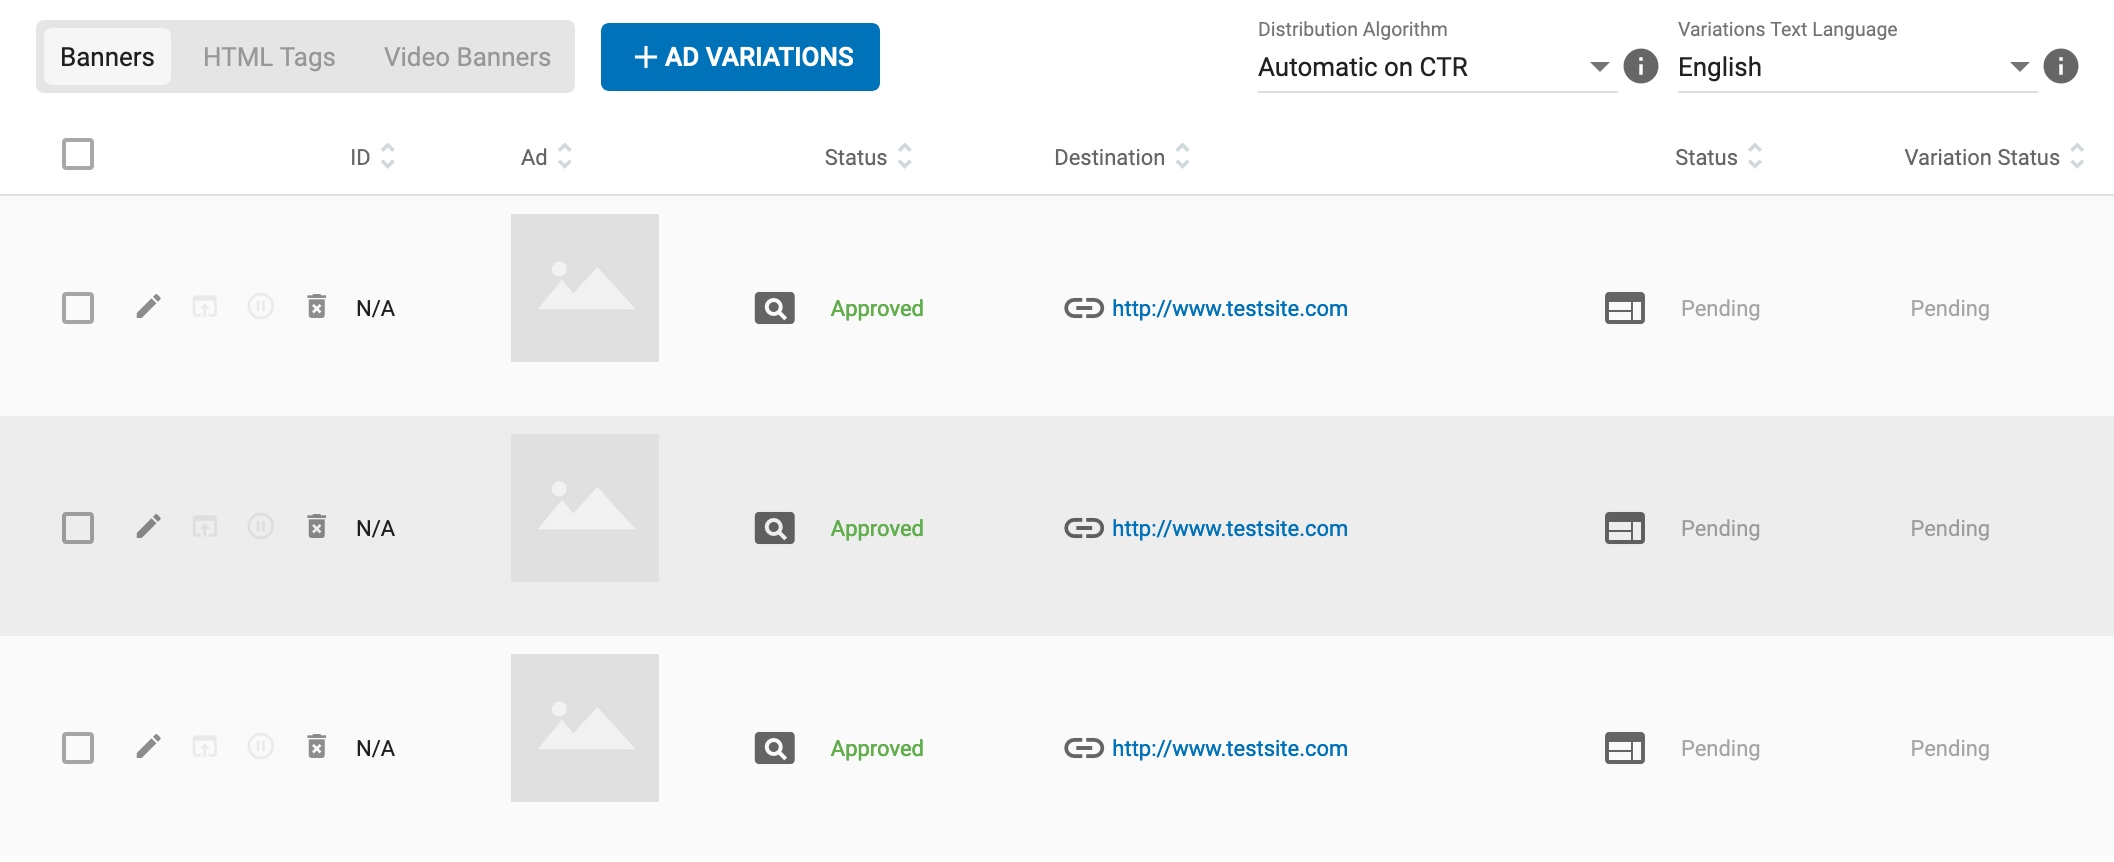
When you have created more than one variation, you will be able to determine how traffic will be distributed between them. If you are using CPM or Smart CPM, you will see a Distribution Algorithm drop-down to the top right of the variations list. There are four algorithms that you can choose from:
Even: Variations that have the same CPM will have traffic evenly distributed between them.
Fixed: Traffic will be distributed between the variations based on the individual
sharepercentage on them.Automatic CTR (Default): Traffic will be distributed between the variations based on their CTR.
Automatic on Conversion Rate: The Advertiser chooses a conversion tracking goal. The variation with the highest conversion rate for that goal will get more traffic.
Fixed Distribution Algorithm
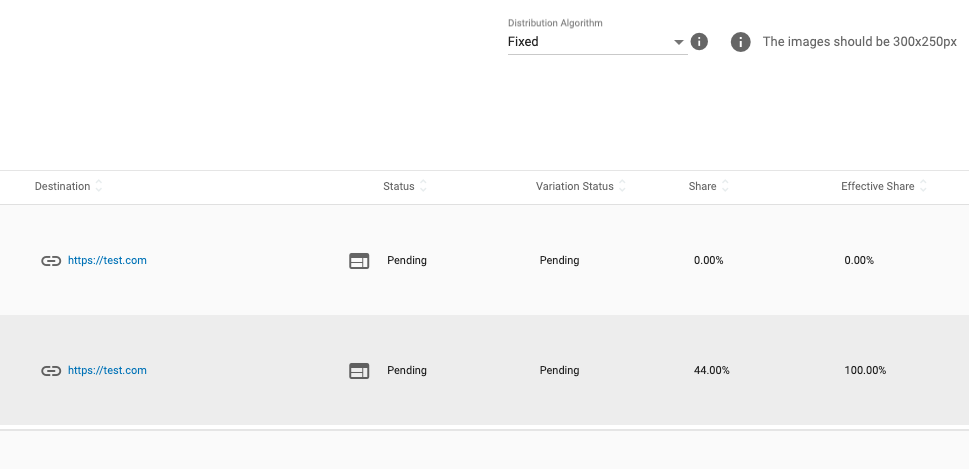
When the fixed distribution algorithm is used, the Advertiser can specify the share percentage of traffic for each of the variations:
It must be a numeric value between 0% and 100%, allowing two decimal places.
Optional for each of the variations if the sum of all shares is > 0.
Share can be set only for active variations (not archived nor paused).
The
Effective Sharevalue is based on the sum of the given shares and is updated while changing any of them.- Effective Share = Share / (sum of all the active variation' shares)
Traffic distribution for automatic optimization
When either type of automatic optimization is used, we use an 80-20 breakdown to distribute traffic:
If there are only normal variations in the campaign, the winning variation will get 80 percent, and the remaining 20 per cent will be distributed among the other variations using the 80-20 breakdown: The second best variation will get 80 percent, and the remaining traffic will get 20 percent, and so on.
If there are variations to be tested, the winning variation will get 80 percent, and the remaining 20 percent will be broken down into 10 percent for normal variations and 10 percent for variations being tested.
