Conversion Tracking
In the Campaigns > Conversion Tracking tab, you can create Goals to track the performance of your campaigns. These goals can allow you to track your customer's progress through your site (e.g. reaching a landing page, sign-up, sale). Once you create a Conversion Tracking Goal, you can then select from two ways of using it:
- Conversion Tracking API - S2S (Recommended)
- Pixel Tracking
Step 1: Creating a conversion tracking goal
![]()
- To create a Conversion Tracking Goal, from the main screen of the Admin Panel, click Campaigns > Conversion Tracking.
- Click the NEW CONVERSION GOAL button.
- The New Conversion Goal form will appear.
Step 2: Set the name, conversion type, conversion value, and order number
![]()
First, set a Name for the goal that you will recognize easily.
Next, choose the Conversion Type from the dropdown. This is a mandatory field and is useful when it comes to pricing algorithms used in Smart Bid. You can choose from the following options:
- App Install
- Lead - Double Opt In
- Lead - Single Opt In
- Multiple Conversions Type - Use this option if you plan to use the same goal for multiple campaigns
- Other
- Purchase - Carrier Billing
- Purchase - COD (Cash on Delivery)
- Purchase - Credit Card
- Subscription - Carrier Billing
- Subscription - Credit Card
- Website Interaction
Next, choose a Conversion Value from the dropdown. The Conversion Value is the monetary value of the conversion, and it is used to determine the Revenue. Profit and ROI (Return on Investment) of the campaigns that use this goal in their funnel. You can choose from the following options:
- No Value - No amount will be associated with the goal when logged.
- Fixed - A fixed amount provided by you will be associated with the goal when logged.
- Dynamic - A dynamic amount will be associated with the goal when logged.
Next, choose a Count value from the dropdown, which will tell you how many times the same conversion can be counted in your statistics. This field gives the option to register a conversion only once or multiple times. You can choose between two options:
- One Conversion: Conversions are unique and can be triggered only once
- Every Conversion: Every conversion per ad click will be considered
Next, choose a Conversion Window value from the dropdown, which corresponds to the amount of time after an ad interaction during which a conversion will still be associated to that campaign. This field provides more flexibility for advertisers to choose the time period during which conversions will be tracked. The available values in the dropdown are:
- 12 hours
- 24 hours (default)
- 2 days
- 3 days
- 7 days
- 30 days
- 90 days
- Custom (Accepting integers from 1 to 90 days)
Next, set the Order number, which is the place in which this goal's results will be displayed in regards to the other goals in the Advertiser account. This sets which goal this tracking pixel corresponds to:
For example, if you set the order as 2, this tracking pixel will correspond to goal G2 when you are viewing goals on the Statistics page.
As you create tracking pixels and set their order, more goals will be created in the system to correspond to them. So if you create 4 tracking pixels and order them 1 to 4, there will be 4 goals, G1 to G4.
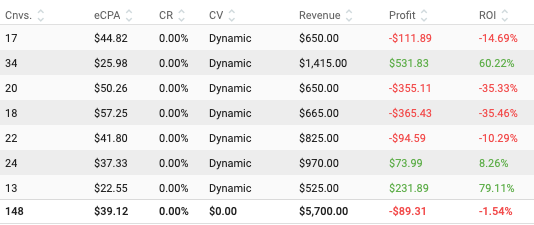
When in the Statistics page, there will also be an eCPA (Effective Cost Per Acquisition) for each of these goals, which you can choose to show in the Goals section of the table data.
If you set up multiple goals with the same Order, the oldest goal will be placed first in the order of statistics (from left to right).
Step 3: Set the Conversion Value
The Conversion Value is the means through which you can set an amount to pay for the conversion of that goal.
For example, if your conversion is setup with a conversion value as Fixed and it represents a completed signup to your portal, you would calculate how much money you make on average from a signed-up user, depending on how long they stay signed up, their membership fee, and so on.
From this, you know the maximum amount you would be willing to spend to get a user to sign up.
If you enter the value as 10.65 into the Fixed Conversion Value field, you can use it to keep track of how much you are spending on conversions of this goal.
As mentioned above, when you view the Statistics tab, you will see your goals and their associated eCPA in the table data.

Once you have set up a conversion goal, the Profit and Revenue will appear in 3 different colors:
- The number is GREEN: ROI is more than 0%. Your return on investment is positive and you are paying less for each conversion than your COA.
- The number is BLACK: ROI is equal to 0%. Your return on investment is almost OK. Check the detailed statistics of the campaign to improve some sources of traffic.
- The number is RED: ROI is less than 0%. Your return on investment is negative and you are paying more for each conversion than you can afford (more than your COA). Check the sources of traffic and your campaign setup for errors.
Step 4: Creating the goal
Once you have set the Name, Conversion Type, Conversion Value, and Order for the goal, click Create.
Step 5: Selecting the conversion tracking method
![]()
Next, in the My Goal screen, from the Select Conversion Tracking Method drop-down, choose the method you would like to use:
- Conversion Tracking API - S2S: Go to Step 6
- Pixel Tracking: Go to Step 7
Step 6: Using Conversion Tracking API - S2S (Recommended)
The request, responses and errors for the Conversion Tracking API are detailed here.
Step 6a: Campaign Setup with Conversion Tracking

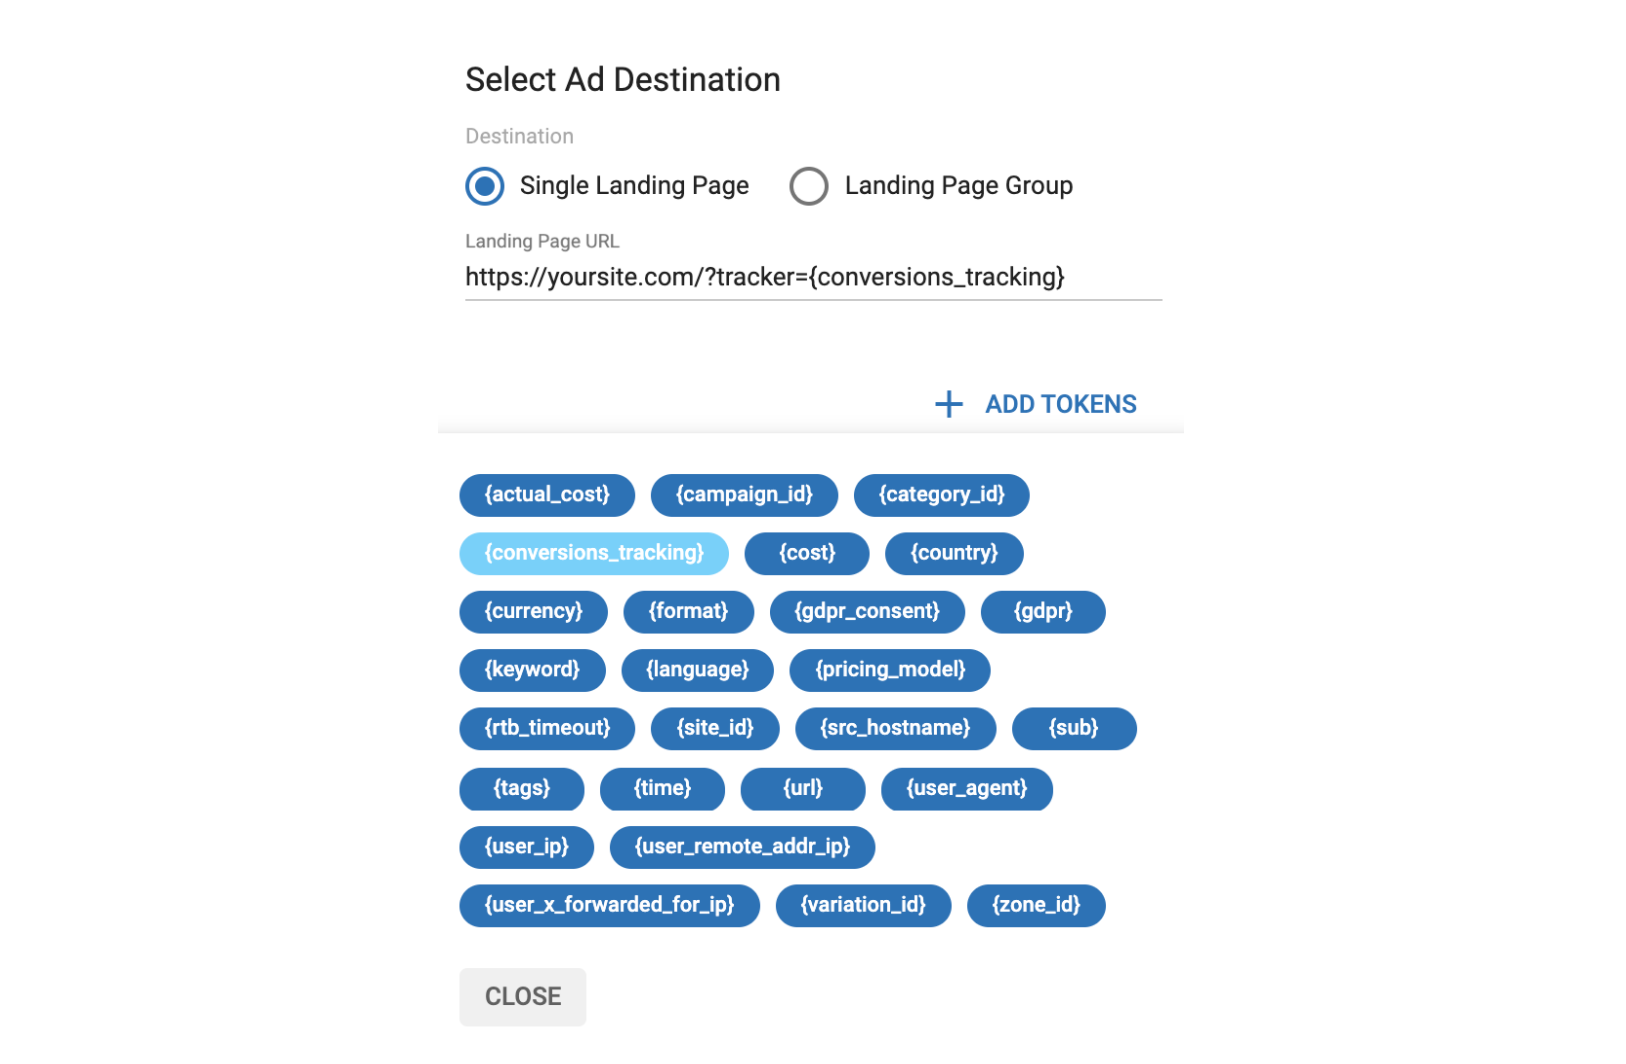
Add a {conversions_tracking} token to your landing page in Step 2: Ads of creating or editing a campaign. To do this, in the Select Ad Destination dialog, click +ADD TOKENS and choose {conversions_tracking}.
Step 6b: Storing the {conversions_tracking} token
When a customer clicks on your ad, we will populate this conversion tracking token with a unique ID. You will need to store this ID for reference when calling the Conversion Tracking API later and when you're triggering a conversion.
Step 6c: Triggering a conversion
Once the customer reaches the conversion goal on your site, you can perform a GET call to the URL below. You will need to replace the {conversions_tracking} in the URL below with the token you received in Step 6b.
http://syndication.examplesite.com/tag.php?goal=1b9b3786eae526755467c2593d194005&tag={conversions_tracking}
Step 6d: Triggering a conversion when conversion value is set as Dynamic
If using dynamic values for tracking monetary conversions values, add &value={conversion_value}. Where {conversion_value} is replaced with a monetary value e.g. 123.45.
https://{NETWORK_CONVERSION_URL}/tag.php?goal={GOAL_ID}&tag={conversions_tracking}&value={conversion_value}
Step 6e: Using Dynamic CPA
![]()
If enabled, you can use the pricing model Dynamic CPA. This allows you to define the CPA price for a campaign on demand.
In order for this to work, you will need to add two things to the URL:
- the 'secret key' that is provided in the Admin Panel, at the bottom of the Conversion Tracking tab.
- the CPA value that you wish to set.
So an example URL using dynamic CPA would look like this:
Secret key=1234567 CPA value=0.1
http://syndication.examplesite.com/tag.php?goal=1b9b3786eae526755467c2593d194005&tag={conversions_tracking}&skey=1234567&cpa=0.1
Postback URL Responses
When the server calls the Postback URL, it can get one of the following responses:
| Response | Meaning |
|---|---|
| OK | The request is OK. Conversion has been registered |
| ERROR: This conversion has already been notified and saved. | A conversion for this conversions_tracking ID has already been registered and cannot be counted again, and the postbak URL has been called multiple times within the "Conversion Window".This happens only with Conversion Goals that Count "One Conversion". |
| ERROR: Tag is invalid! | The format of the conversions_tracking ID is not correct. Happens when the {conversions_tracking} is missing or does not have all the required characters (min. 150, max. 700). |
| ERROR: No tag data. | The conversion_tracking ID is missing. |
| ERROR: Goal ID is invalid. | The format of the Goal ID is not correct. Goal IDs are 32 characters of hexadecimal (0-9, a-f). |
| ERROR: No Goal ID. | The tag or Goal ID is missing. |
| ERROR: Conversion window is not respected. | The postback URL has been called outside the Conversion Window. |
Step 7: Using Pixel Tracking
Step 7a: Pixel Tracking
If you select Pixel tracking from the Select Conversion Tracking Method drop-down, the pixel tracking script will appear in the box below.
![]()
<!-- START examplesite.com Goal Tag | Test Goal -->
<script type="application/javascript" src="https://ads.examplesite.com/tag_gen.js" data-goal="44521a5f9795760d326a5def51360908"></script>
<!-- END examplesite.com Goal Tag | Test Goal -->
Click Copy to copy this script, so you can paste it onto the relevant pages on your site.
Step 7b: Dynamic Conversion Value
If the goal is of type Dynamic conversion value then you will see an extra parameter as data-value in order to provide the dynamic monetary value.
![]()
<!-- START examplesite.com Goal Tag | dynamic goal -->
<script type="application/javascript" src="https://a.examplesite.com/tag_gen.js" data-goal="3cdf52a2019f03044fbe1320eb9a1a8a" data-value="{conversion_value}"></script>
<!-- END examplesite.com Goal Tag | dynamic goal -->
Click Copy to copy this script, so you can paste it onto the relevant pages on your site.
